Building Galley House
Evil Trout’s second game, The Incident at Galley House, is out now on Steam!
Last year, after The Roottrees are Dead shipped, I wrote a technical blog post about its development, which was well received, so I decided to do the same thing for this game.
Note: The images in this post have minor spoilers for the beginning of the game. If you want to be 100% spoiler free, now’s your chance to run away.
Contents
- Starting from the Web
- Controlling the Machine
- Builds
- Build Sidequest: Video Memory and Quality Settings
- Godot: Still a Great Choice
- Development Philosophy
- Spreadsheet Driven Development
- Rendering the Machine
- The Scene Tool
- Priority Rendering
- Internationalization via Rube Goldberg Machine
- Final Thoughts
Starting from the Web
The Incident at Galley House is a re-imagining of Type Help, a text game released for free on itch.io in 2025. It was quickly acclaimed by fans of mystery deduction games, and is currently the 2nd highest rated game on the Interactive Fiction Database.
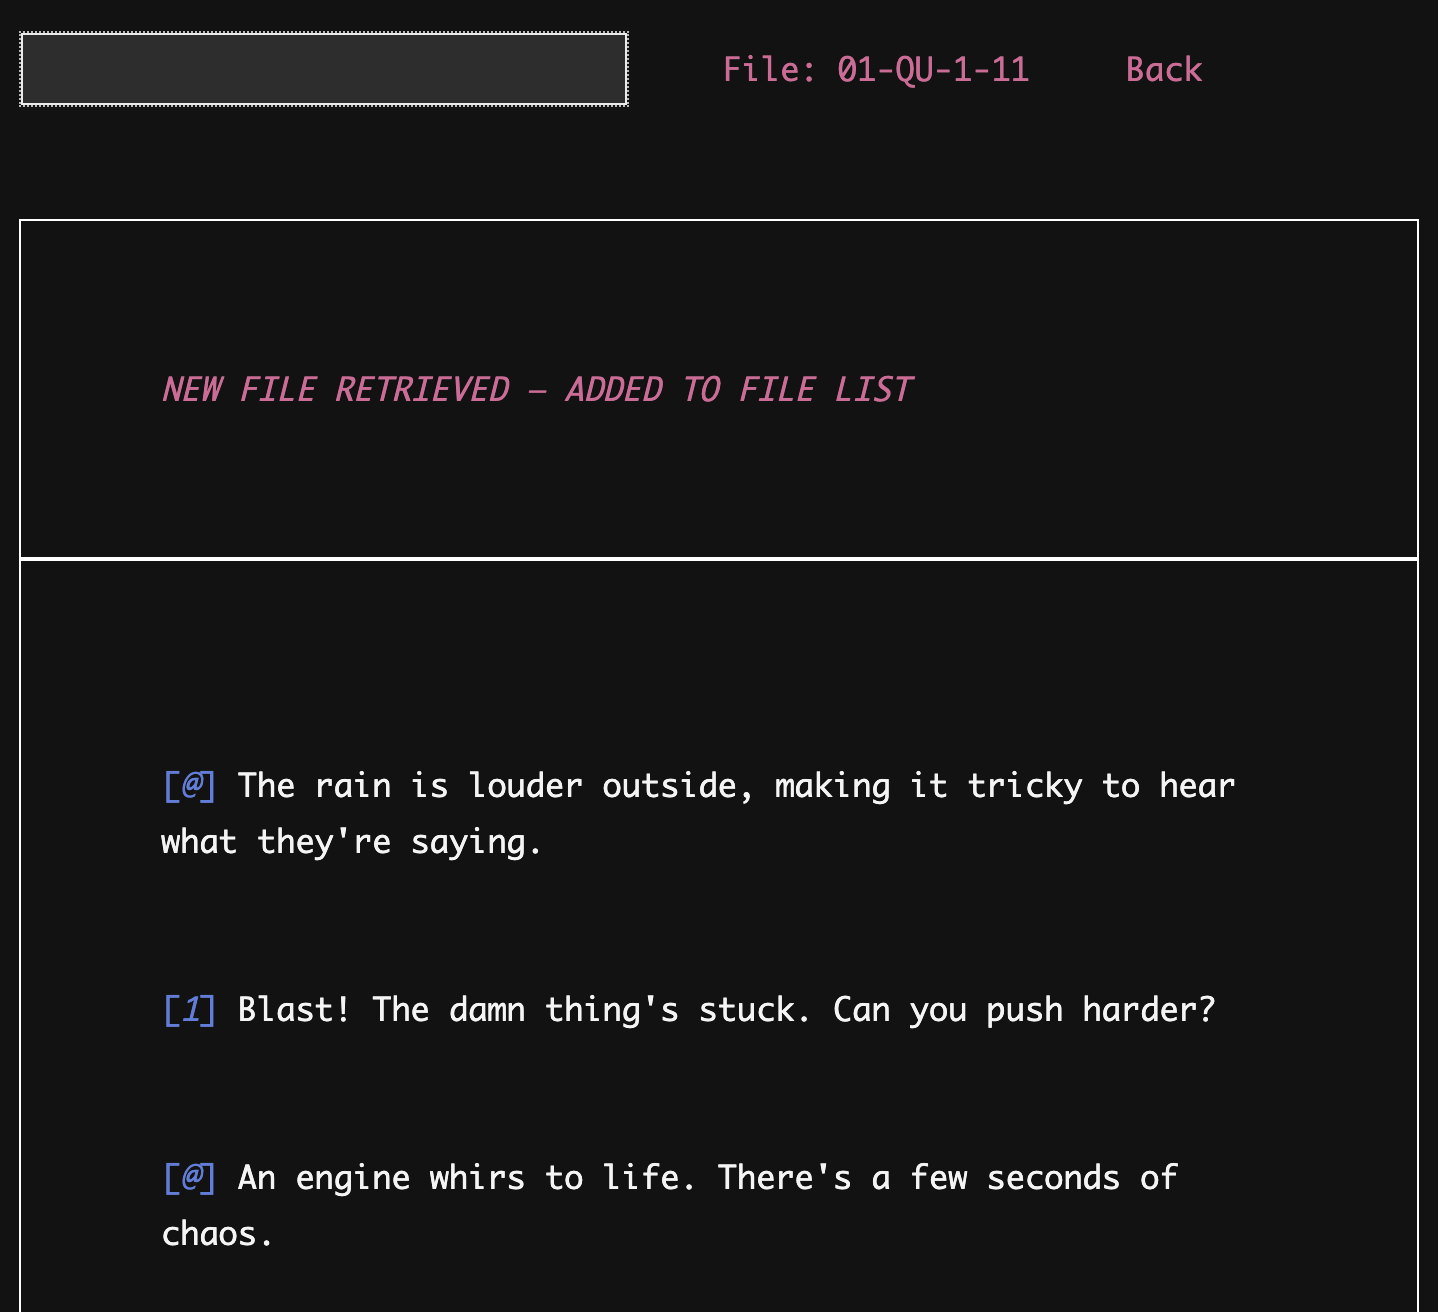
A screenshot of Type Help
Type Help was designed by William Rous using Twine and exported to HTML. I reached out to William in early 2025, shortly after Roottrees was released, when I wasn’t sure what to tackle next. Fortunately he was enthusiastic about partnering up, and work started in earnest in the Spring of 2025.
HTML is a great way to prototype a narrative game. You can email around a single document and it can run on virtually anything. It’s also very easy to parse. It only took a few hours to extract all the HTML data into a format our game engine used.
In Autumn 2025, when we decided to add extra content beyond the original Type Help, William brought out Twine again for it, despite us having a more or less full working game engine for Galley House at that time.
We went through several major passes of the new content and puzzles in Twine, and even brought in trusted external testers to try it out. It was a great way to work. Art and voiceover are expensive to produce compared to a little HTML file, so it makes way more sense to get a fun prototype working before entering full production.
Controlling the Machine
After Roottrees shipped, I spent a little while trying to figure out how it could work on a controller. I was never really happy with any of the prototypes I came up with, because so much of the game depends on typing in web searches to a fake search engine.
In Type Help, the core gameplay involves entering filenames into an old computer. When you find a valid file, it is displayed to you. This is still typing, but the components of the file name are finite, and I thought it could be a much better fit for a controller interface.
I mentioned this to Jeremy Johnston (designer of The Roottrees are Dead and now a member of Evil Trout Inc.), and the next day he brought me the idea of the machine: a physical contraption players can use to enter codes in Galley House. I’d been thinking of drop downs and checkboxes, but his idea was that you could play with something tactile in 3D space, turning knobs and moving levers. It was such a great idea! We pitched it to William and he agreed; it was amongst the first things we designed for Galley House.
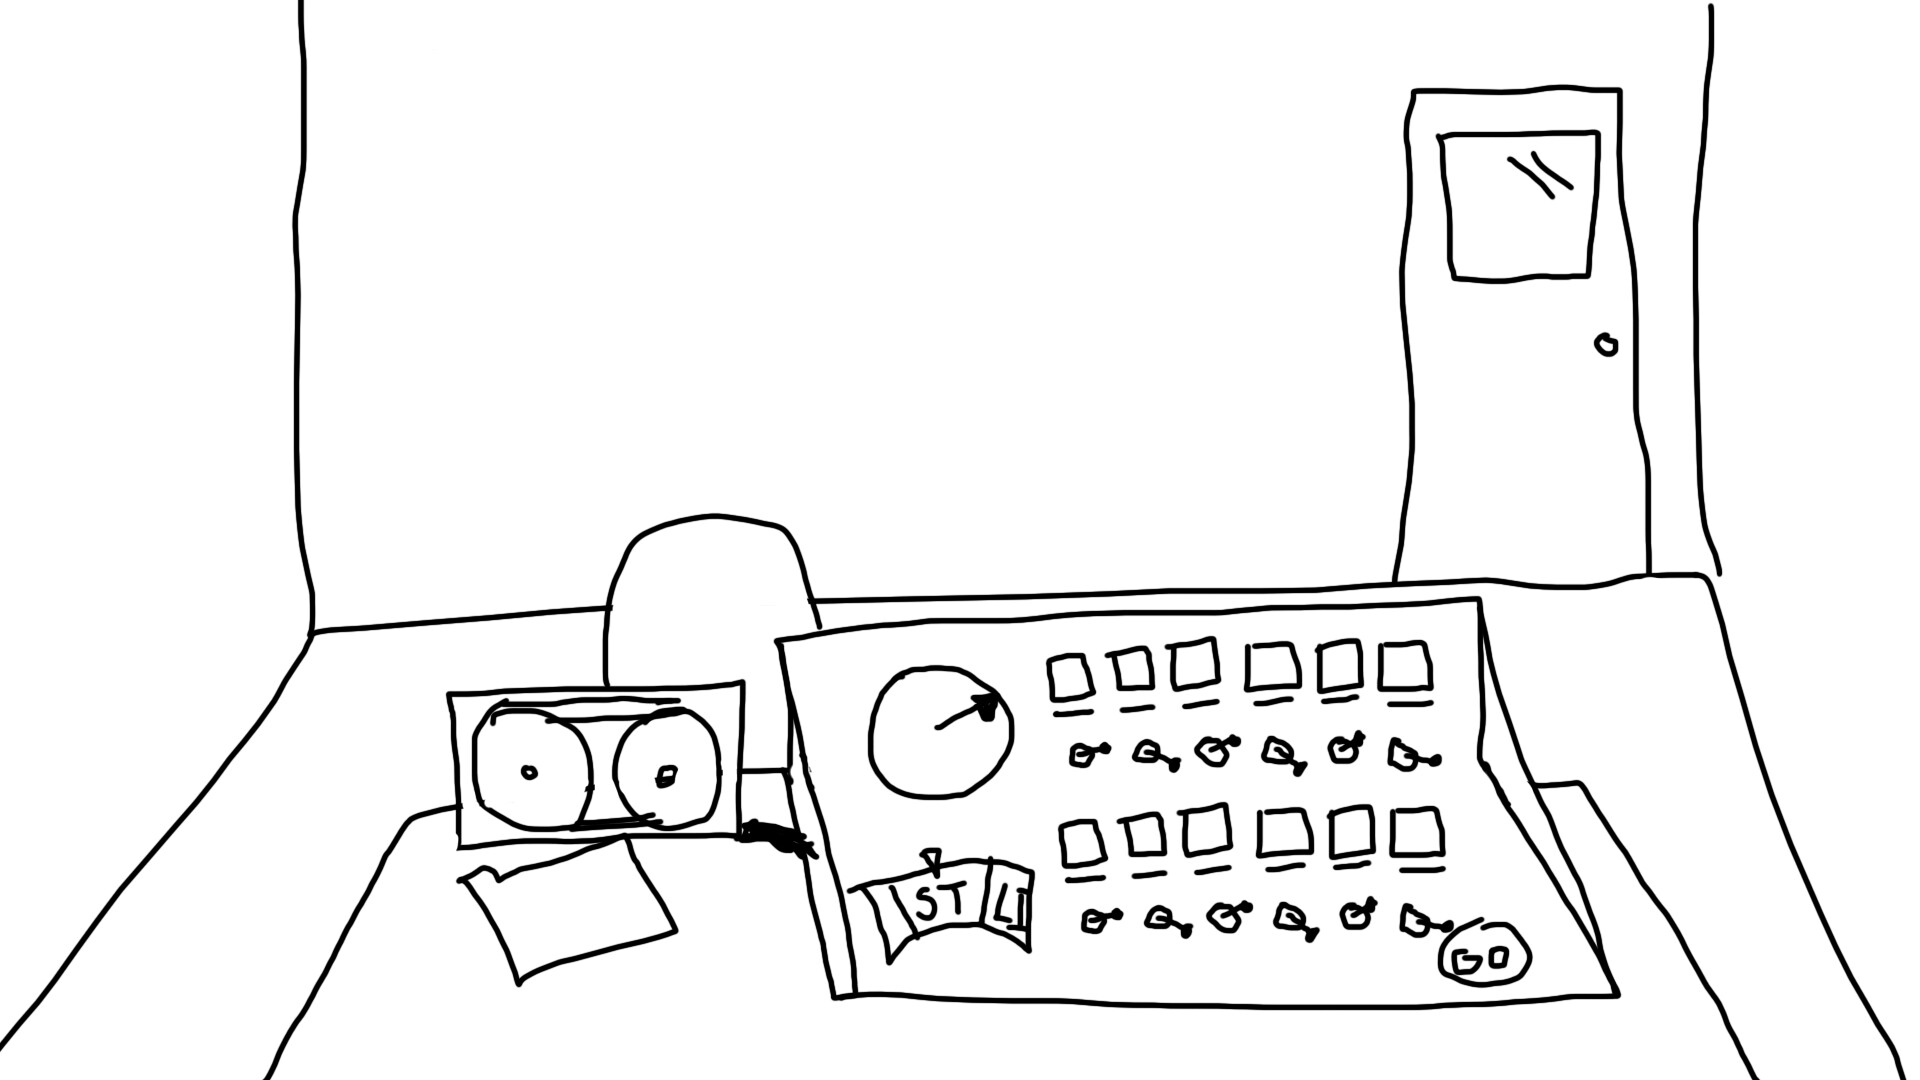
An early sketch of the machine
This is a perfect example of good design coming from constraints. With a mouse and keyboard, it’s trivial to input a code. But it’s so much more fun for players to mess with a physical thing and see how it reacts.
Builds
For Roottrees, I ran all builds on my Windows desktop, using Godot’s export templates for Windows/Mac/Linux. You can even codesign your Mac binaries using rcodesign. However, I discovered a big limitation of cross-building this way: shader baking.
From the Godot Docs:
The editor running on Windows can export shaders for Vulkan and Direct3D 12.
The editor running on macOS can export shaders for Vulkan and Metal.
The editor running on Linux can export shaders for Vulkan only.
I highly recommend baking shaders for your game to reduce the initial loading step, as well as stutters during gameplay. Unfortunately, this means if you’re targeting Direct3D 12 on Windows and Metal like we were, you’ll need a Windows machine and a Mac.
Windows Build Server: I picked up a
Minisforum MS-02 for
Windows and Linux builds. It runs Windows 11 and a self-hosted GitHub
Actions runner. When you push to a beta branch it will trigger a build and
push it to Steam. I’m a sucker for little computers like this, and it has
a lot of power under the hood.
Mac Build Server: Mac Minis and Studios unfortunately became really hard to get thanks to the global memory shortage and interest in personal AI assistants. Almost all models and configurations were sold out, but I did manage to order an M4 Max Mac Studio which took 6 weeks to ship despite being last year’s model. It’s a sweet little box though, and does a great job of building on a Mac.
Build Sidequest: Video Memory and Quality Settings
One surprise on the Mac was that the textures looked noticeably worse in 3D. We use VRAM compressed textures virtually everywhere, and the compression was much worse on the Mac builds of the game.
Turning on high quality for texture imports made them look much better,
but at the expense of more video memory.
I was a little worried about using more video memory, because in The Roottrees are Dead I naively loaded every texture when the game loaded, which used around 2.5GB of VRAM. At the time, I thought it was not a problem, as I assumed all integrated graphics cards had unified memory with the system and even a 4GB laptop should run the game. I was mistaken!
Since Evil Trout games are puzzles that don’t have twitch gameplay, it’s always been important that they run on older computers. It’s even OK if the framerate in the 3D sections is bad. People can put up with it to get to the meat of the puzzles on older machines.
However, it turns out there are a whole bunch of laptops and integrated graphics cards that aren’t unified, or allocate a small slab of VRAM.
Fortunately, we were only targeting Apple Silicon Macs, which all have unified
video memory, so my solution was to enable high quality textures for
everything on the Mac build only. Windows and Linux users get the regular
quality textures which already look good enough on those platforms.
Godot: Still a Great Choice
This is the second game I’ve shipped in Godot and I’m still very happy with it. This time I didn’t end up submitting any patches to Godot as everything went smoothly.
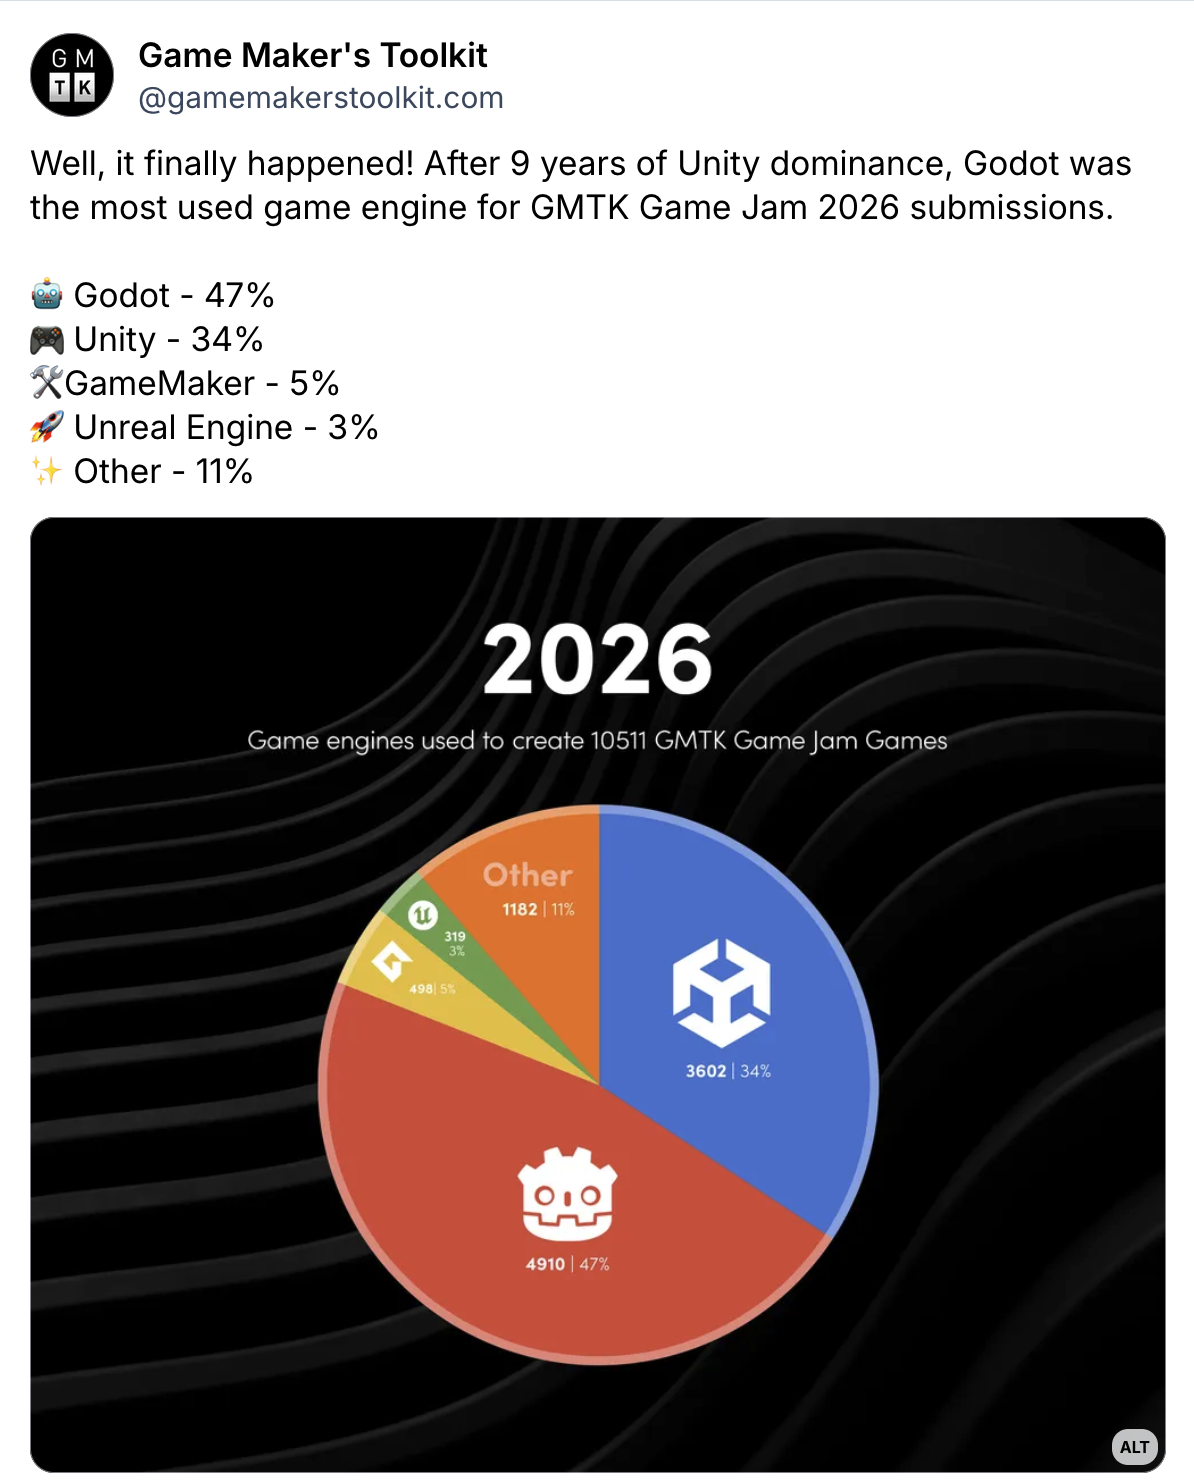
Godot recently became the most popular game engine on the GMTK Game Jam
We shipped on Godot 4.6.3, which was an upgrade from 4.4.1 for Roottrees.
Like The Roottrees are Dead, The Incident at Galley House has a fair number of UI systems. Virtually everything was laid out with containers which I understand even better having used them for two games now.
Once I got everything working, I wanted to make the menus “juicy” by introducing animations. This was somewhat annoying to do in Godot 4.6 as containers can’t animate easily. I ended up converting most of the lists of items to relatively positioned items and doing the layout myself. In other words, I used containers for prototyping, and once the UI was working well I converted it over.
I was very happy (and a little jealous) to see that in 4.7 Godot supports extra transforms on Control nodes. It came out way too late in Galley House’s development to consider upgrading. It would have totally solved my problems so I’m excited to try it for future projects.
I think my biggest pain point with Godot for this project was how theming
works. The theme interface works great on a Control by Control basis, but I
really miss CSS from web development. Godot either gives you global themes or
you can give any Control a theme_type_variation and style that. I would
have really liked to be able to apply a theme variation using something akin
to a CSS selector so I could apply rules to a series of nested child nodes.
Development Philosophy
Iteration is the key to good design, so most of my technical and production decisions were about enabling that.
The initial development sprint was all about getting to a version of the game that worked, so we could then iterate on it.
I wasn’t afraid to push out something that was ugly or hard to use, because I knew I’d circle back. Virtually all user interface systems ended up being re-done at least twice.
We’ve received a lot of praise for the UI in Galley House, and it’s entirely due to this process. It can be psychologically difficult to go back and rebuild something over and over, but it’s definitely worth it.
The number one enemy of iteration is blocking, so I was always prioritizing issues that blocked other people from doing their jobs.
A great co-worker is one who takes work off your plate. Obviously it’s impossible to do this all the time, but I tried my best to give people tools to enable them to do their job, then quickly get out of the way.
Spreadsheet Driven Development
Like with The Roottrees are Dead, we used Google Sheets to store most of the game’s data. We had one spreadsheet, broken down into several sub-sheets. It contained the entire script for the game, all evidence, hints, credits and more.
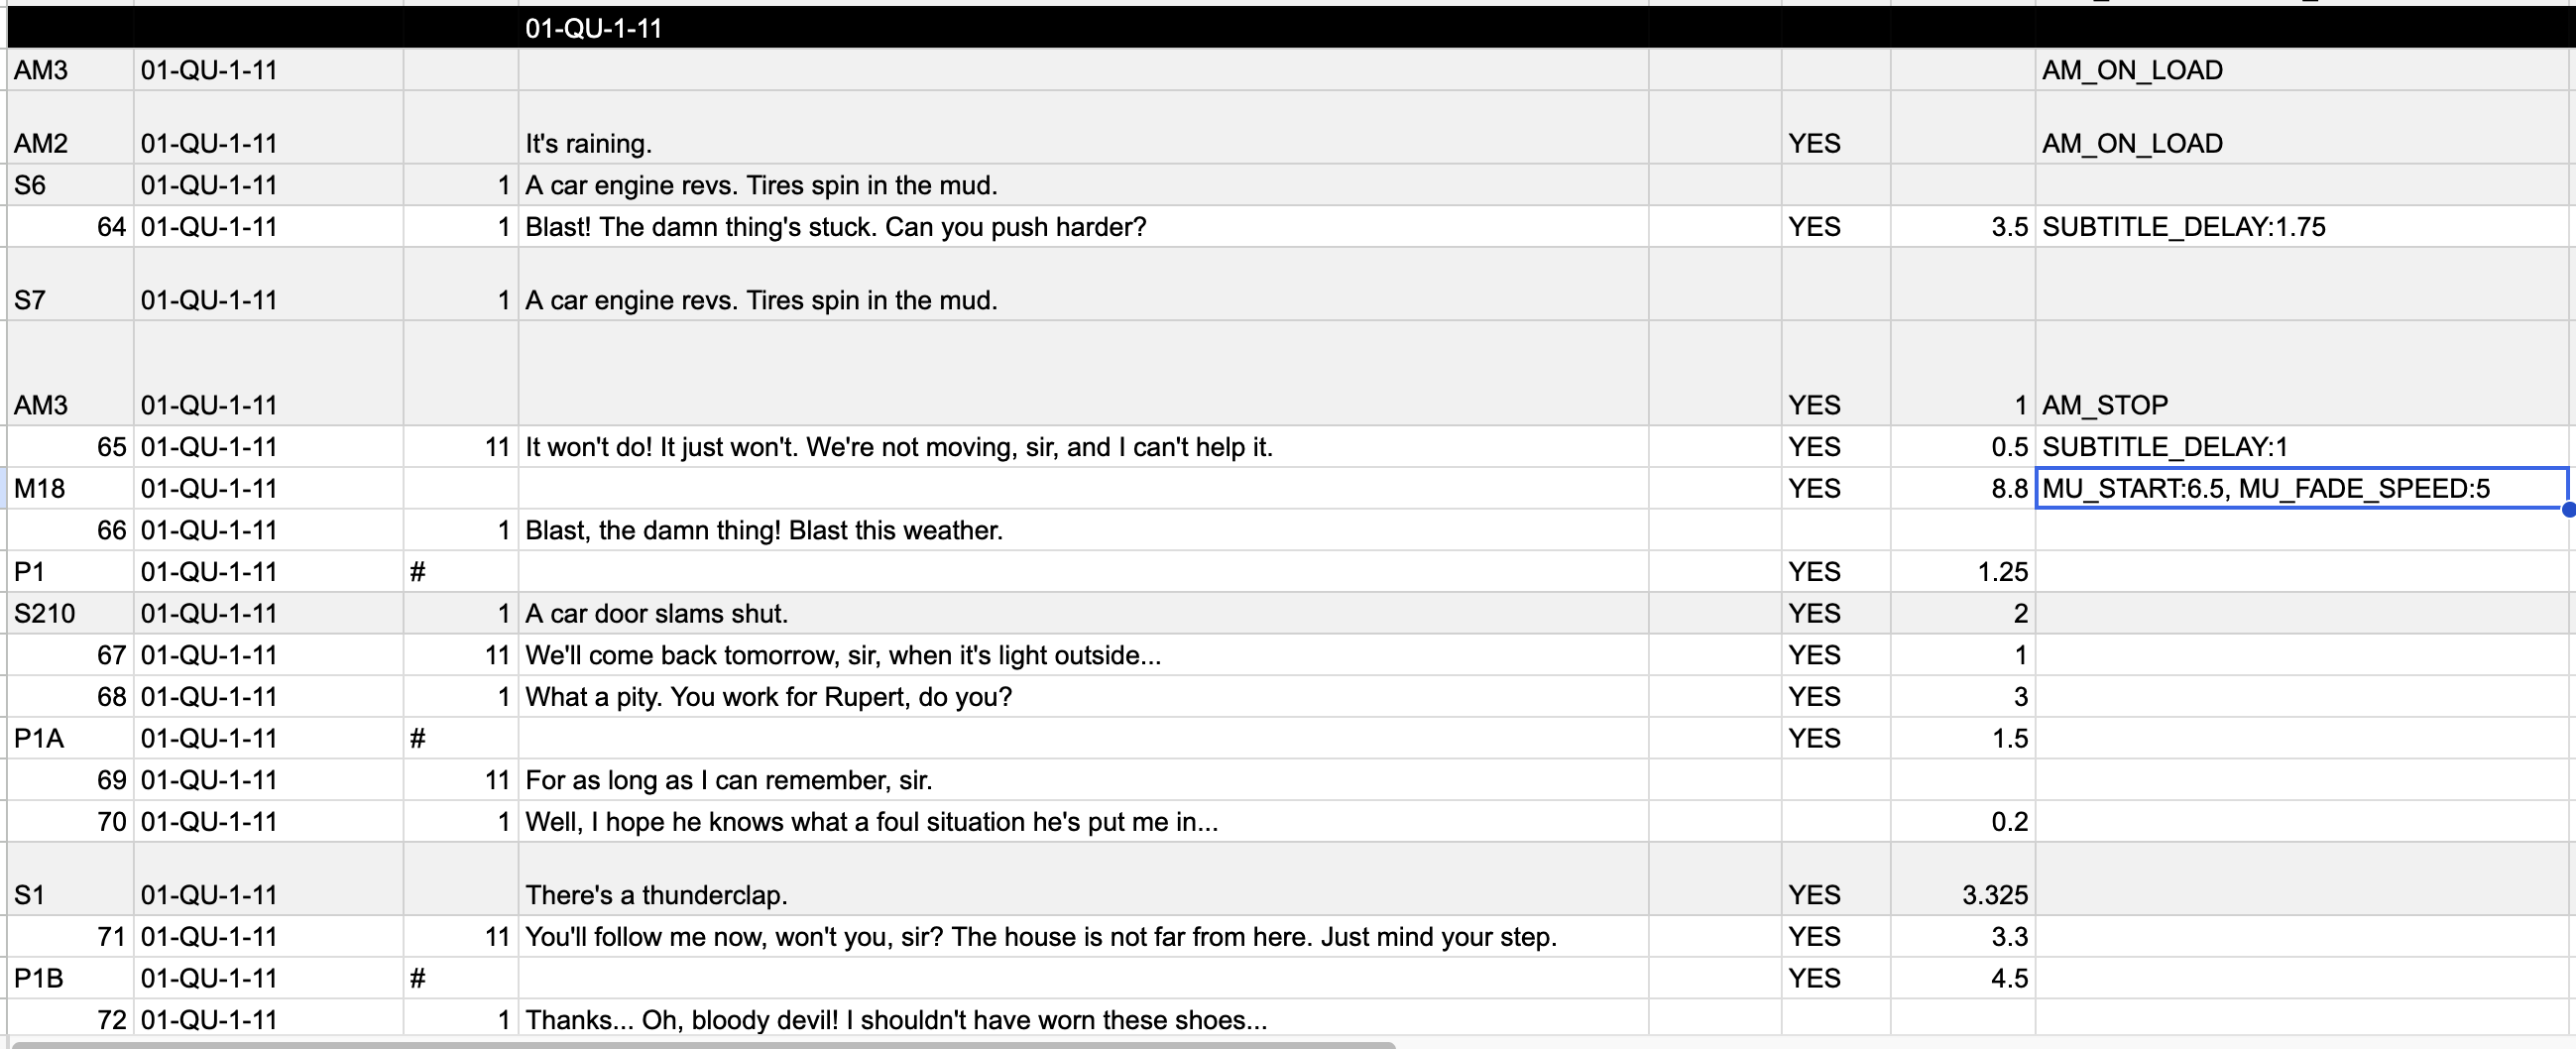
A peek behind the scenes
In the Roottrees codebase, I had a local Python script setup that would fetch every sheet, run some basic validation and post-processing and create the files for our Godot importers.
For Galley House, I moved most of that code to a web service written in Node.js. It would download all the sheets in parallel, tidy up the data, validate it, and create the final JSON to be consumed by the game.

The journey of Galley House’s game data
One nice thing about this approach is there was just one endpoint for everything. You could make a single HTTP request to get all the game data packaged for you.
Godot has support for HTTP requests, so I wired up our game so that developers could hit Ctrl-R and it would refresh the game data without restarting the game. This was a huge time saver, as it meant that Jeremy and others could make changes in the spreadsheet, hit Ctrl-R and see how it looked in the game. It was effective enough that Jeremy never bothered to install or learn Godot, because he was able to do all design changes in the spreadsheet and other tools.
Rendering the Machine
The Machine is made up of a lot of similar elements. There are 15 little monitors, each with a dial below them that can be turned. There are also 16 possible slots for room names, each with their own indicator light. When you activate the machine, electricity flows through various wires based on your selections.
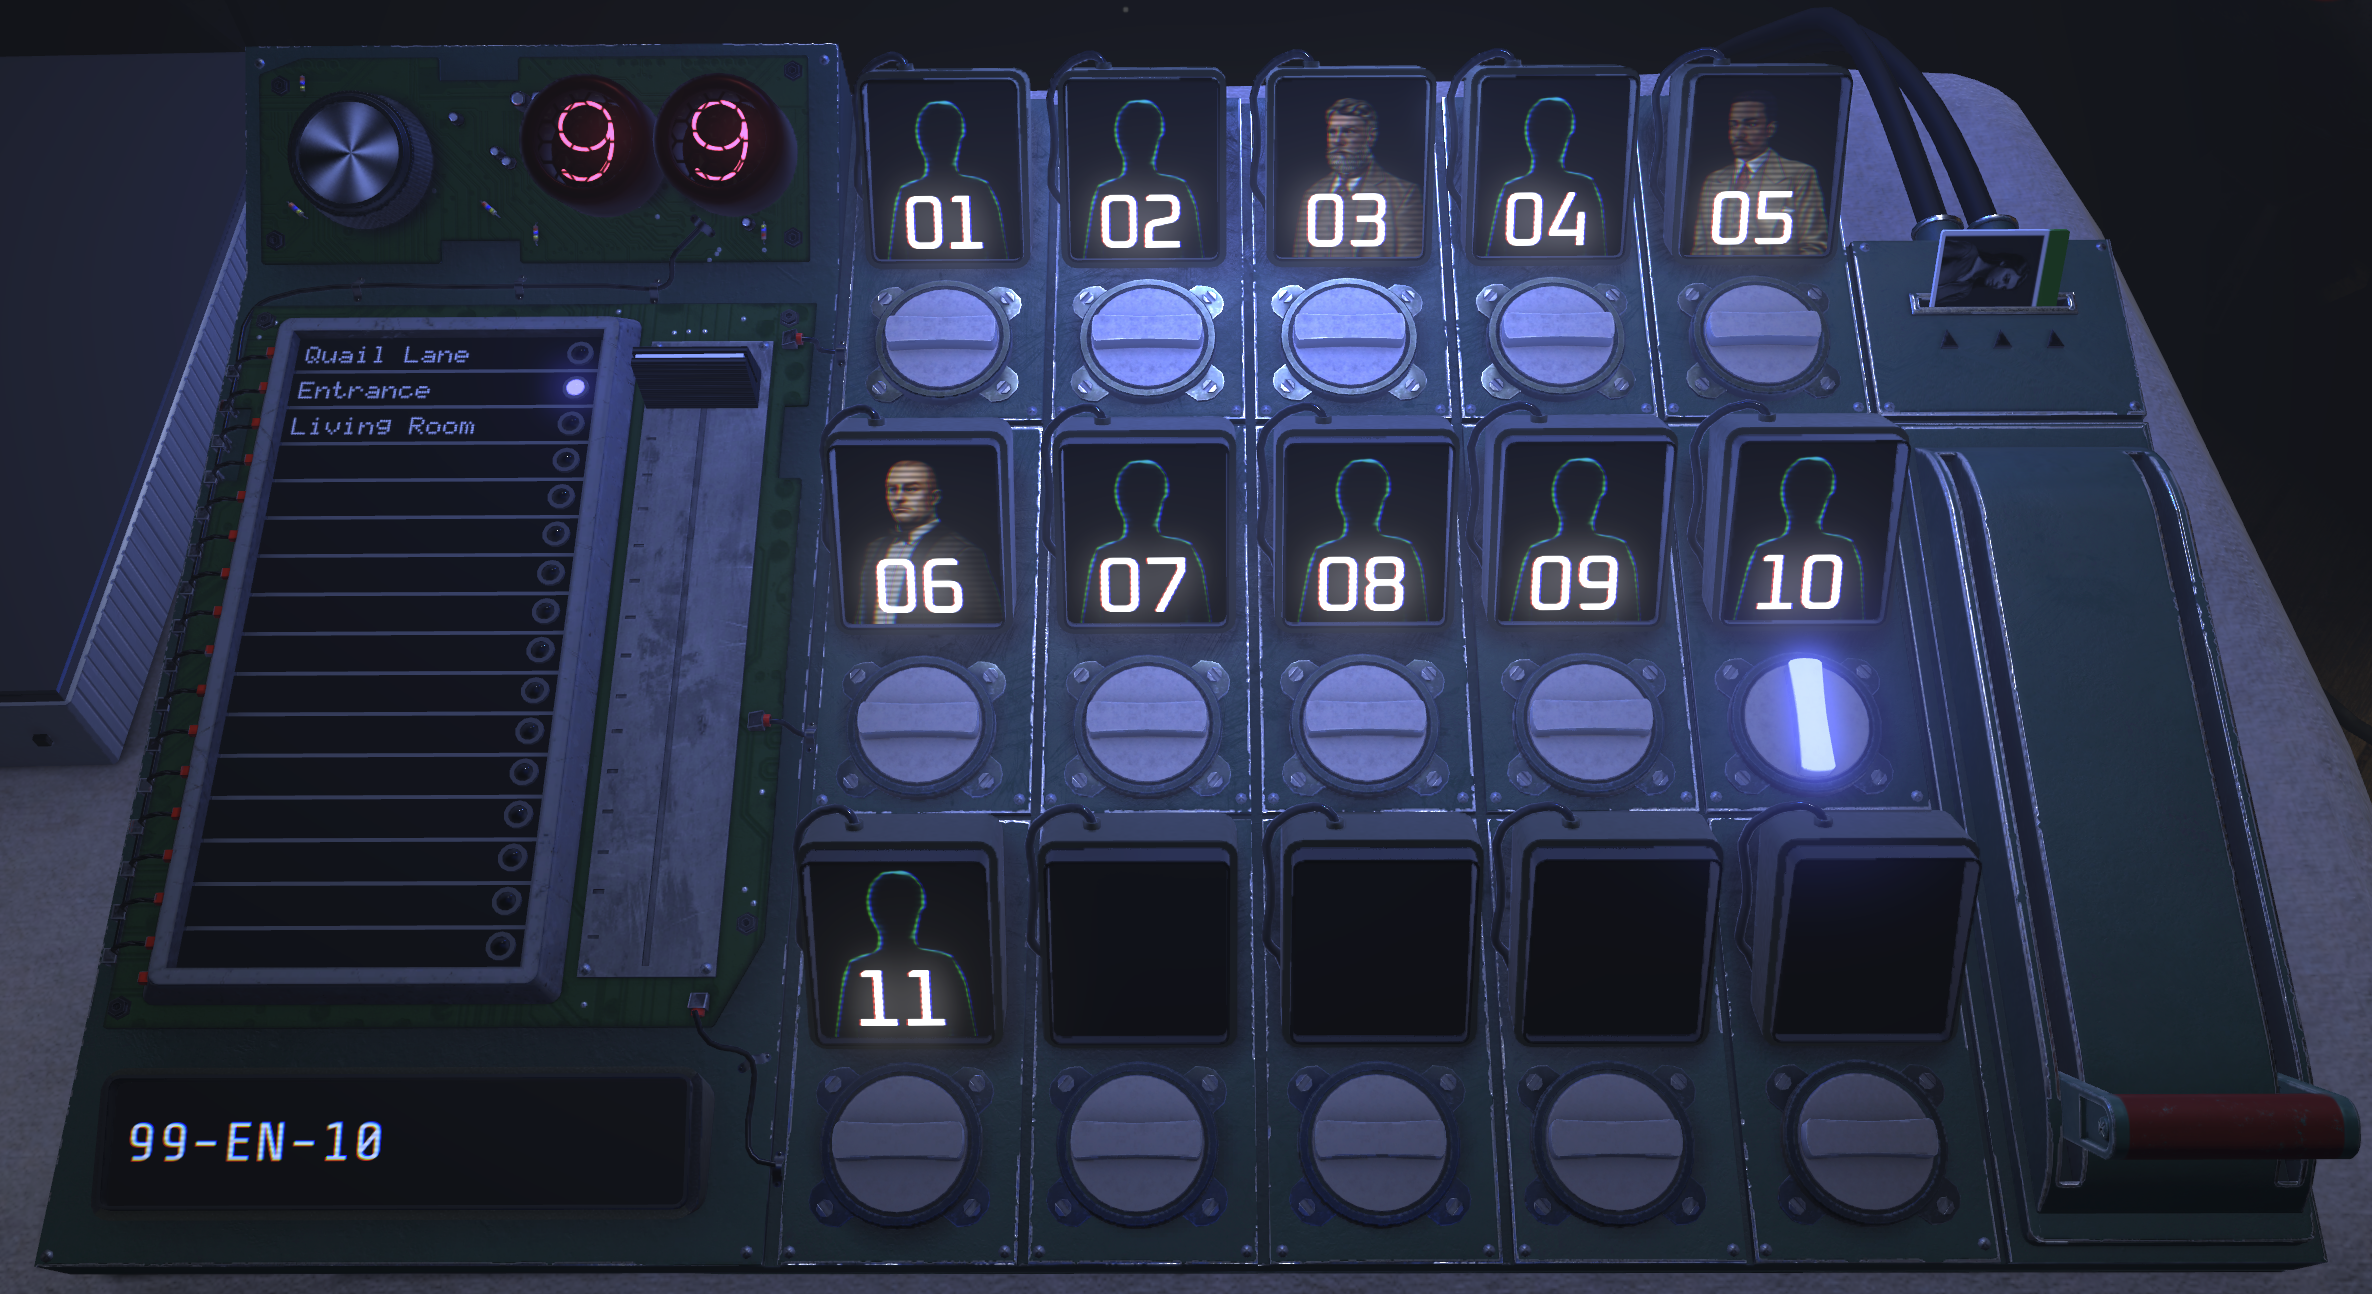
The machine rendered in game
Any time I see myself rendering many of the same thing, I reach for Godot’s MultiMeshInstance3D system, so that I can draw things in a batch rather than one at a time.
The downside of rendering in a batch is that you have to think carefully about what data you pass through to each instance to be rendered. I got in the habit of passing data through instance colours rather than setting up custom data, because custom data had compatibility issues on The Roottrees are Dead. This might be fixed in newer versions of Godot, but colours are so simple that I’ve not bothered to investigate more.
For an example of how I use colour, when you turn a dial on the machine, I use the red colour value to go from 0.0 (not turned) to 1.0 (turned).
A vertex shader will then rotate the knob accordingly, and the fragment shader will add a glow to the knob using a mask stored in the vertex colours based on whether the machine is on or not.
For displaying the contents of the monitors, all of them point at the same large texture, but are passed a separate UV fragment in the red and green colour channels. Since the player can calibrate what’s shown on each screen, that image is dynamically updated whenever they recalibrate.
Finally, the electricity moves through the wires by lighting up their UVs. I
laid them out in Blender so that the start of the wire is one end of the UV
and the end is the other, so a fragment shader can nicely light them up as
they go along. We also heavily abuse EMISSION and glow post processing to make it look cool.
The Scene Tool
We had some discussions in the early development of the game about how the scenes would be presented. Initially, we thought we’d display it like a conventional visual novel, where characters all appeared in the foreground at roughly the same size.
Our early prototypes did this automatically, based on how many characters were in a given scene. It would space them out evenly. It worked, but we found that in some scenes it got very crowded, and in others it felt like characters were standing near each other who should be further apart.
Our first idea was to introduce a micro-format to our spreadsheet to
determine how people should be grouped. You could say something like:
1, 2, 3 ... 5, 6 and it would space them out. It would have worked, but I
kept coming back to an earlier idea I had during development, where the 2D
illustrations of people could be positioned in the background illustration,
using a depth effect to scale them, like point and click adventure games do.
We came up with a quick prototype and everyone agreed it looked much better than having all the characters up front, but it was obvious that no micro-format would be up to the task. You’d need to be able to specify someone’s position in X, Y and scale, plus whether they were flipped, etc.
Leveraging my background in web development, I created a web-tool that we could use to stage the scenes. Because I’m bad at naming things, it got called the “scene tool” and was used heavily by Jeremy to stage all the scenes in the game.
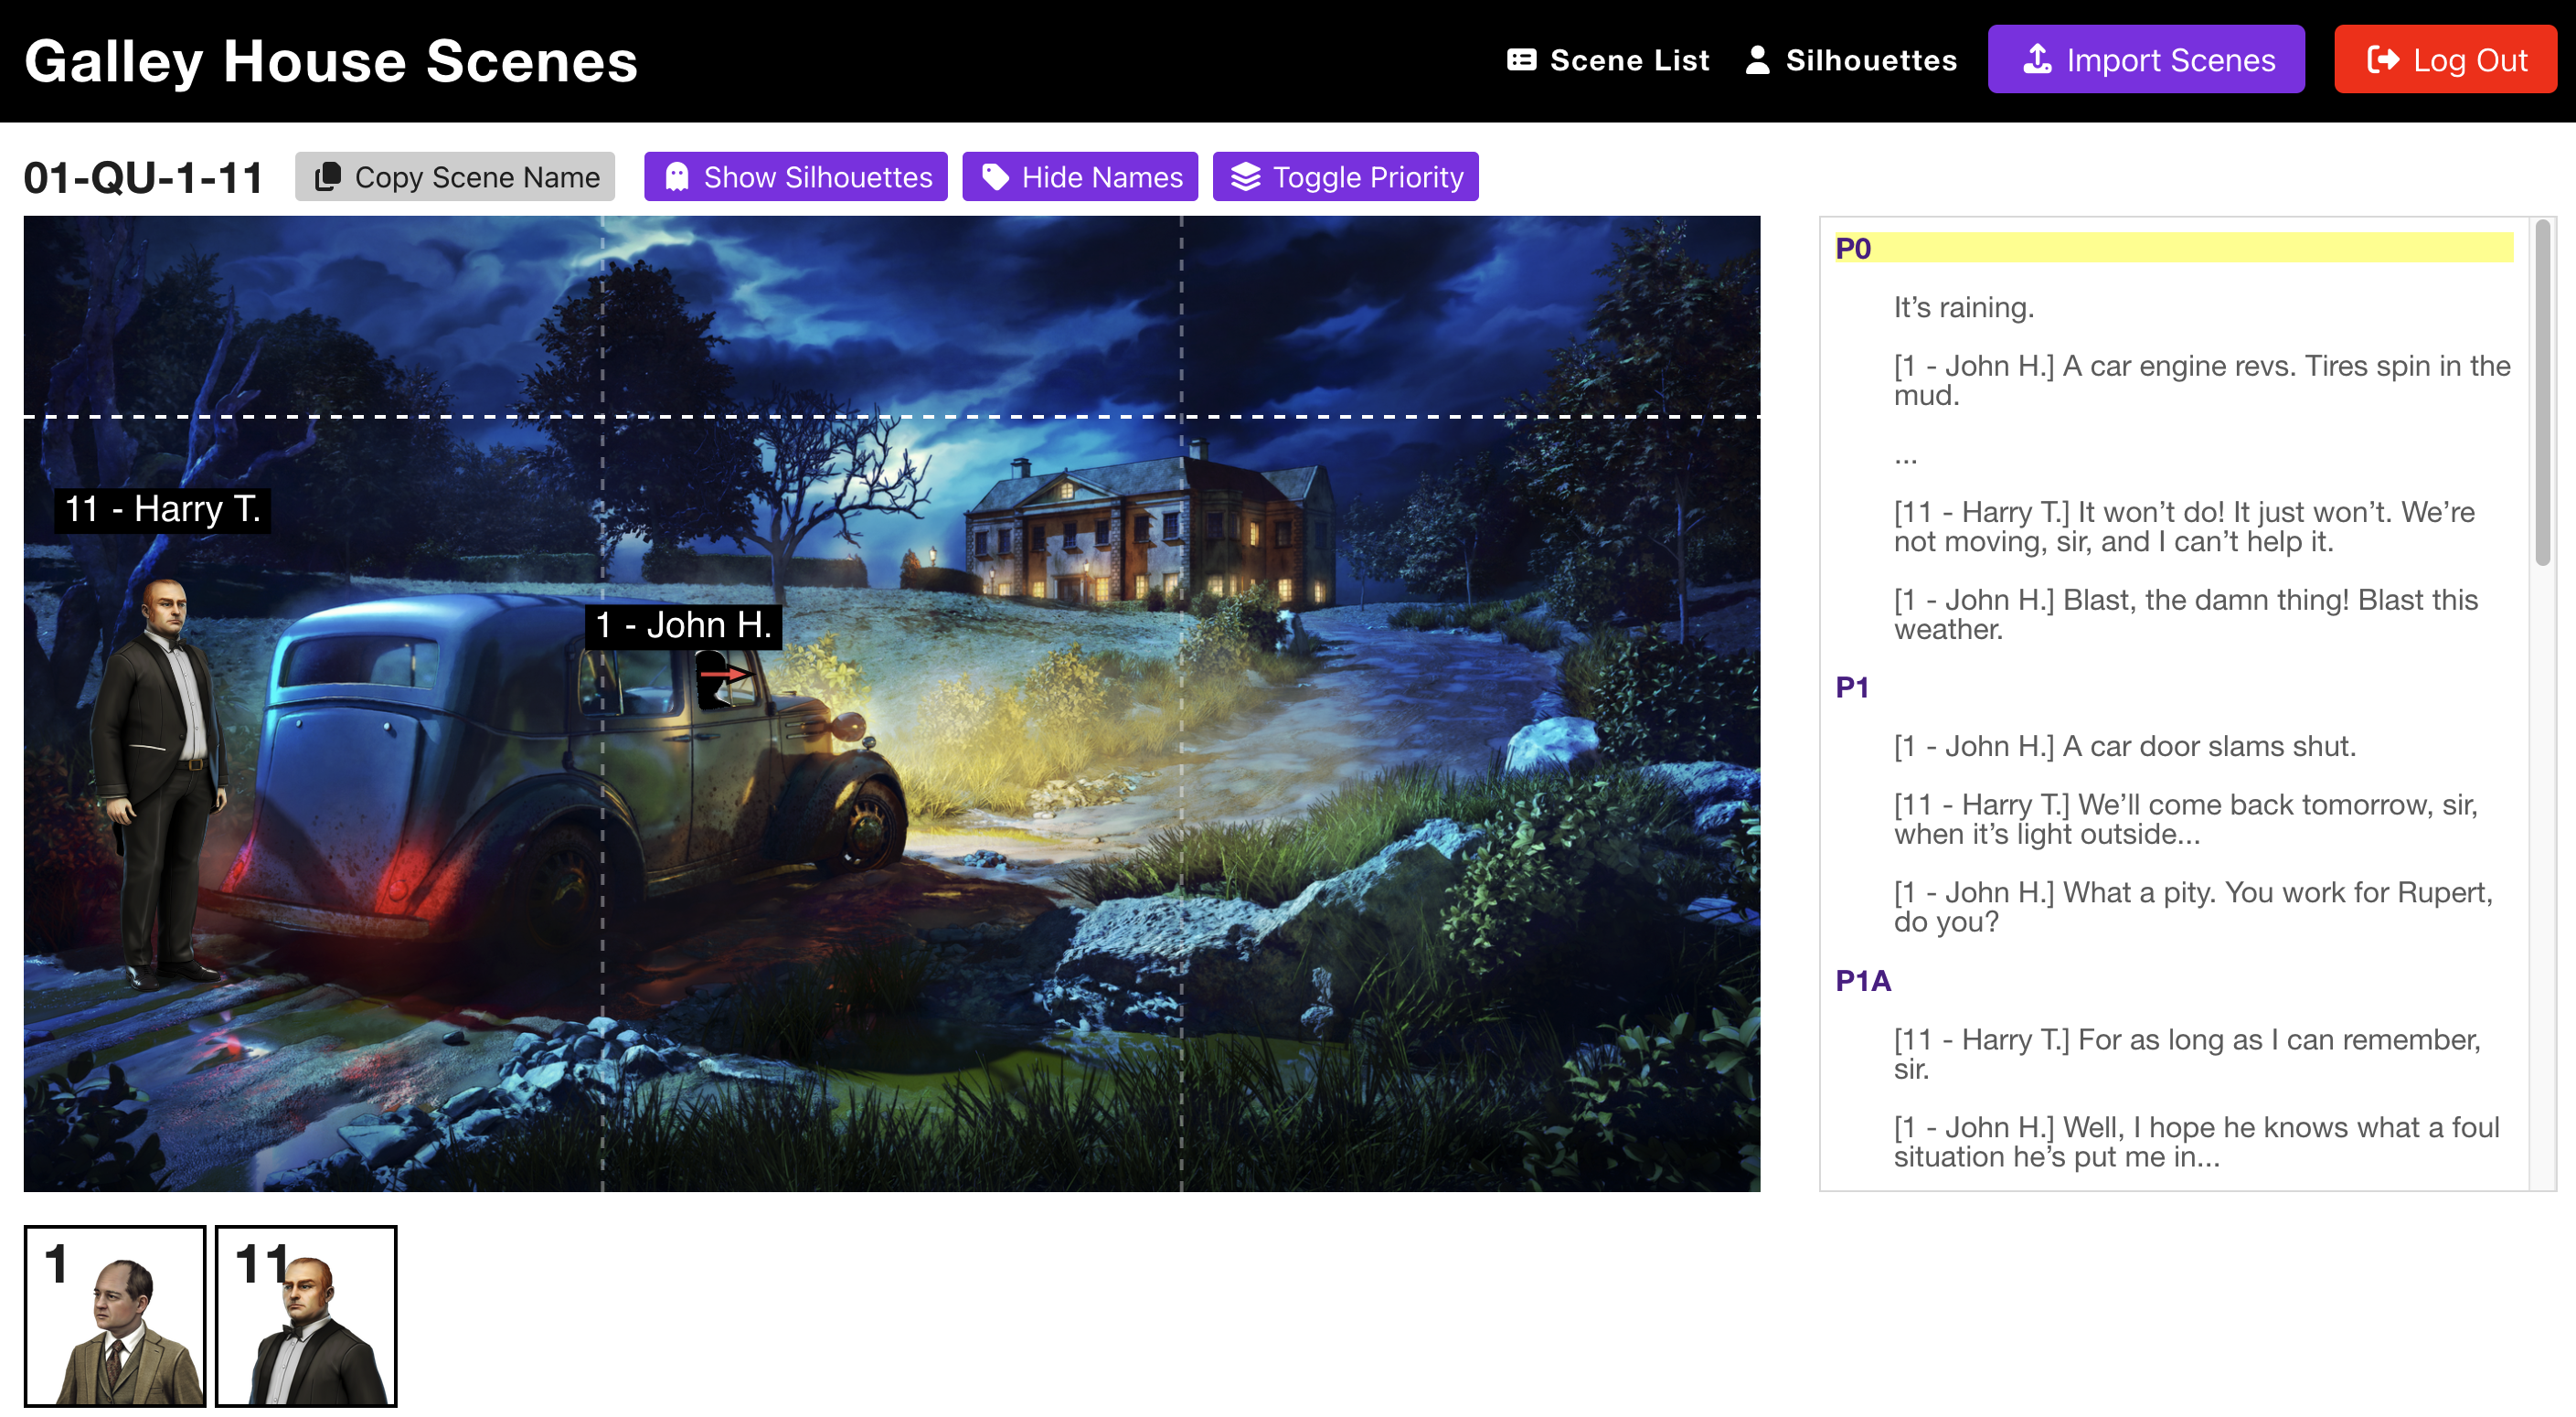
Our custom scene building web app
The tool reads script lines from the Google Sheet, but you can also insert keyframe lines, which indicate you want people to be able to move. On any of those keyframes, you can adjust position, scale, flips and a bunch of other options we ended up adding.
The first versions of most scenes were pretty basic. People would stand around, maybe move near the door if they were leaving or that kind of thing. But as time went on and Jeremy staged more scenes, he realized that by adding more movement and flipping characters it made the scenes more dynamic and inviting.
While I do believe the game would look amazing if we could have had proper animations for everything, that was simply not an option for a team our size with our budget. I’m very happy with what we came up with given those limitations.
I would be remiss if I omitted the huge weight our voice actors carried here. Their amazing performances under direction by Kirsty Gillmore bring everything together.
Priority Rendering
I’ve been a lifelong fan of point and click adventure games, and as a child, I was blown away by how in King’s Quest, you could move your character behind and in front of objects in rooms.
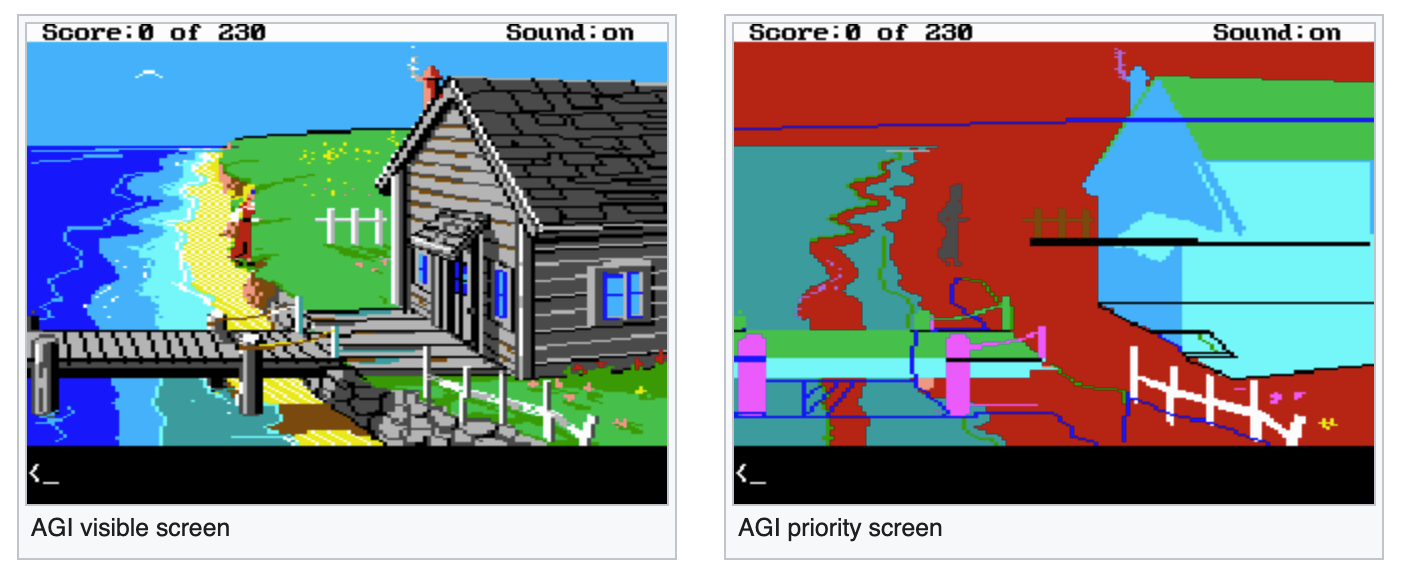
King’s Quest 4 Priority Example. Source: ScummVM Wiki
As an adult I delved deeper into these mechanisms, even going as far as making a semi-popular YouTube video about how the graphics worked.
The Incident at Galley House gave me the opportunity to put my esoteric knowledge to use. I created a colour mask in Photoshop for each scene, which represented the depths of various objects in the room.
When using the scene tool, you can click a button to see the priorities represented by various colours, and move characters back and forth accordingly so that they approximate 3D in the 2D scene.
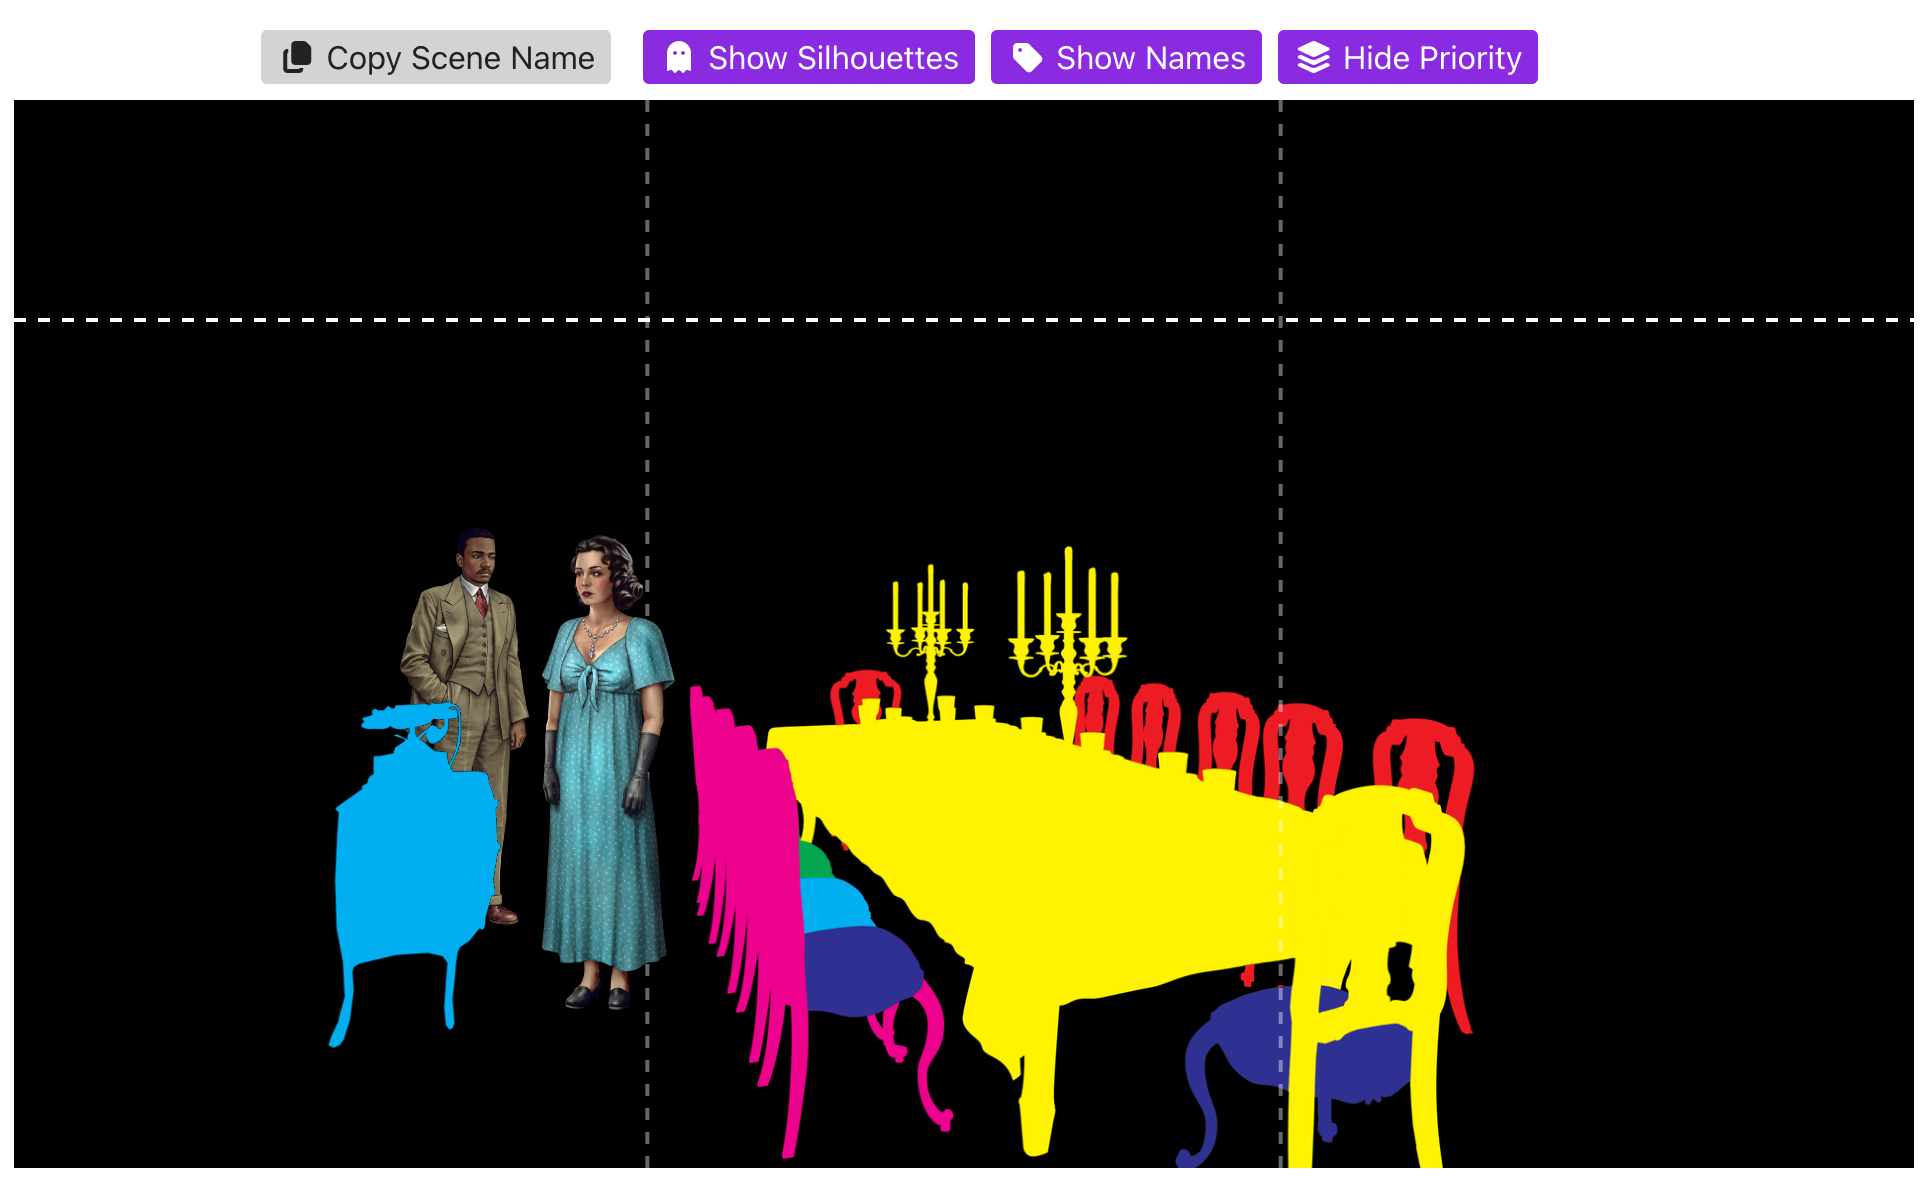
Showing priorities in the scene tool
There are only 8 depths possible per pixel, which fits nicely into one byte.
I have a custom importer in Godot that creates a Image.FORMAT_RG8 from the
data, which is passed through to the shader that renders characters in
scenes. The shader can easily mask out people depending on their current
priority value.
This was quite fun to implement, but performance-wise I don’t think any graphics card would have a hard time rendering all the things in a scene as separate sprites in order. When I cut out the parts of the room into colours in Photoshop, I could have saved them as layers, sorted them in the cinematic renderer, and it would have worked just as well. Arguably that would have been the smarter choice, but I’ve found a great productivity hack is to lean into tasks that are more fun to put together.
Internationalization via Rube Goldberg Machine
The Roottrees are Dead was built with localization in mind, with one exception: evidence images. Those were often things like magazine covers, book or CD covers that had English text on them.
All the text was present in their UI descriptions, so a non-English speaker could still read all the clues and details of the evidence, but it was definitely a worse experience.
When we started working on the Simplified Chinese version, our translator recommended translating all the evidence images, so we went the extra mile for that market and it made for a much better game. Chinese players told us that they loved it.
Unfortunately, it was a very manual process. The translator had to open the PSDs for the images, replace text and fonts and make sure everything worked out properly.
For The Incident at Galley House, I wanted a much more automated system to ensure that every image and texture in the game that contained text was also translated from our database.
I realize that what I built is a little… nuts. But, before you judge me too harshly, know that it actually worked!
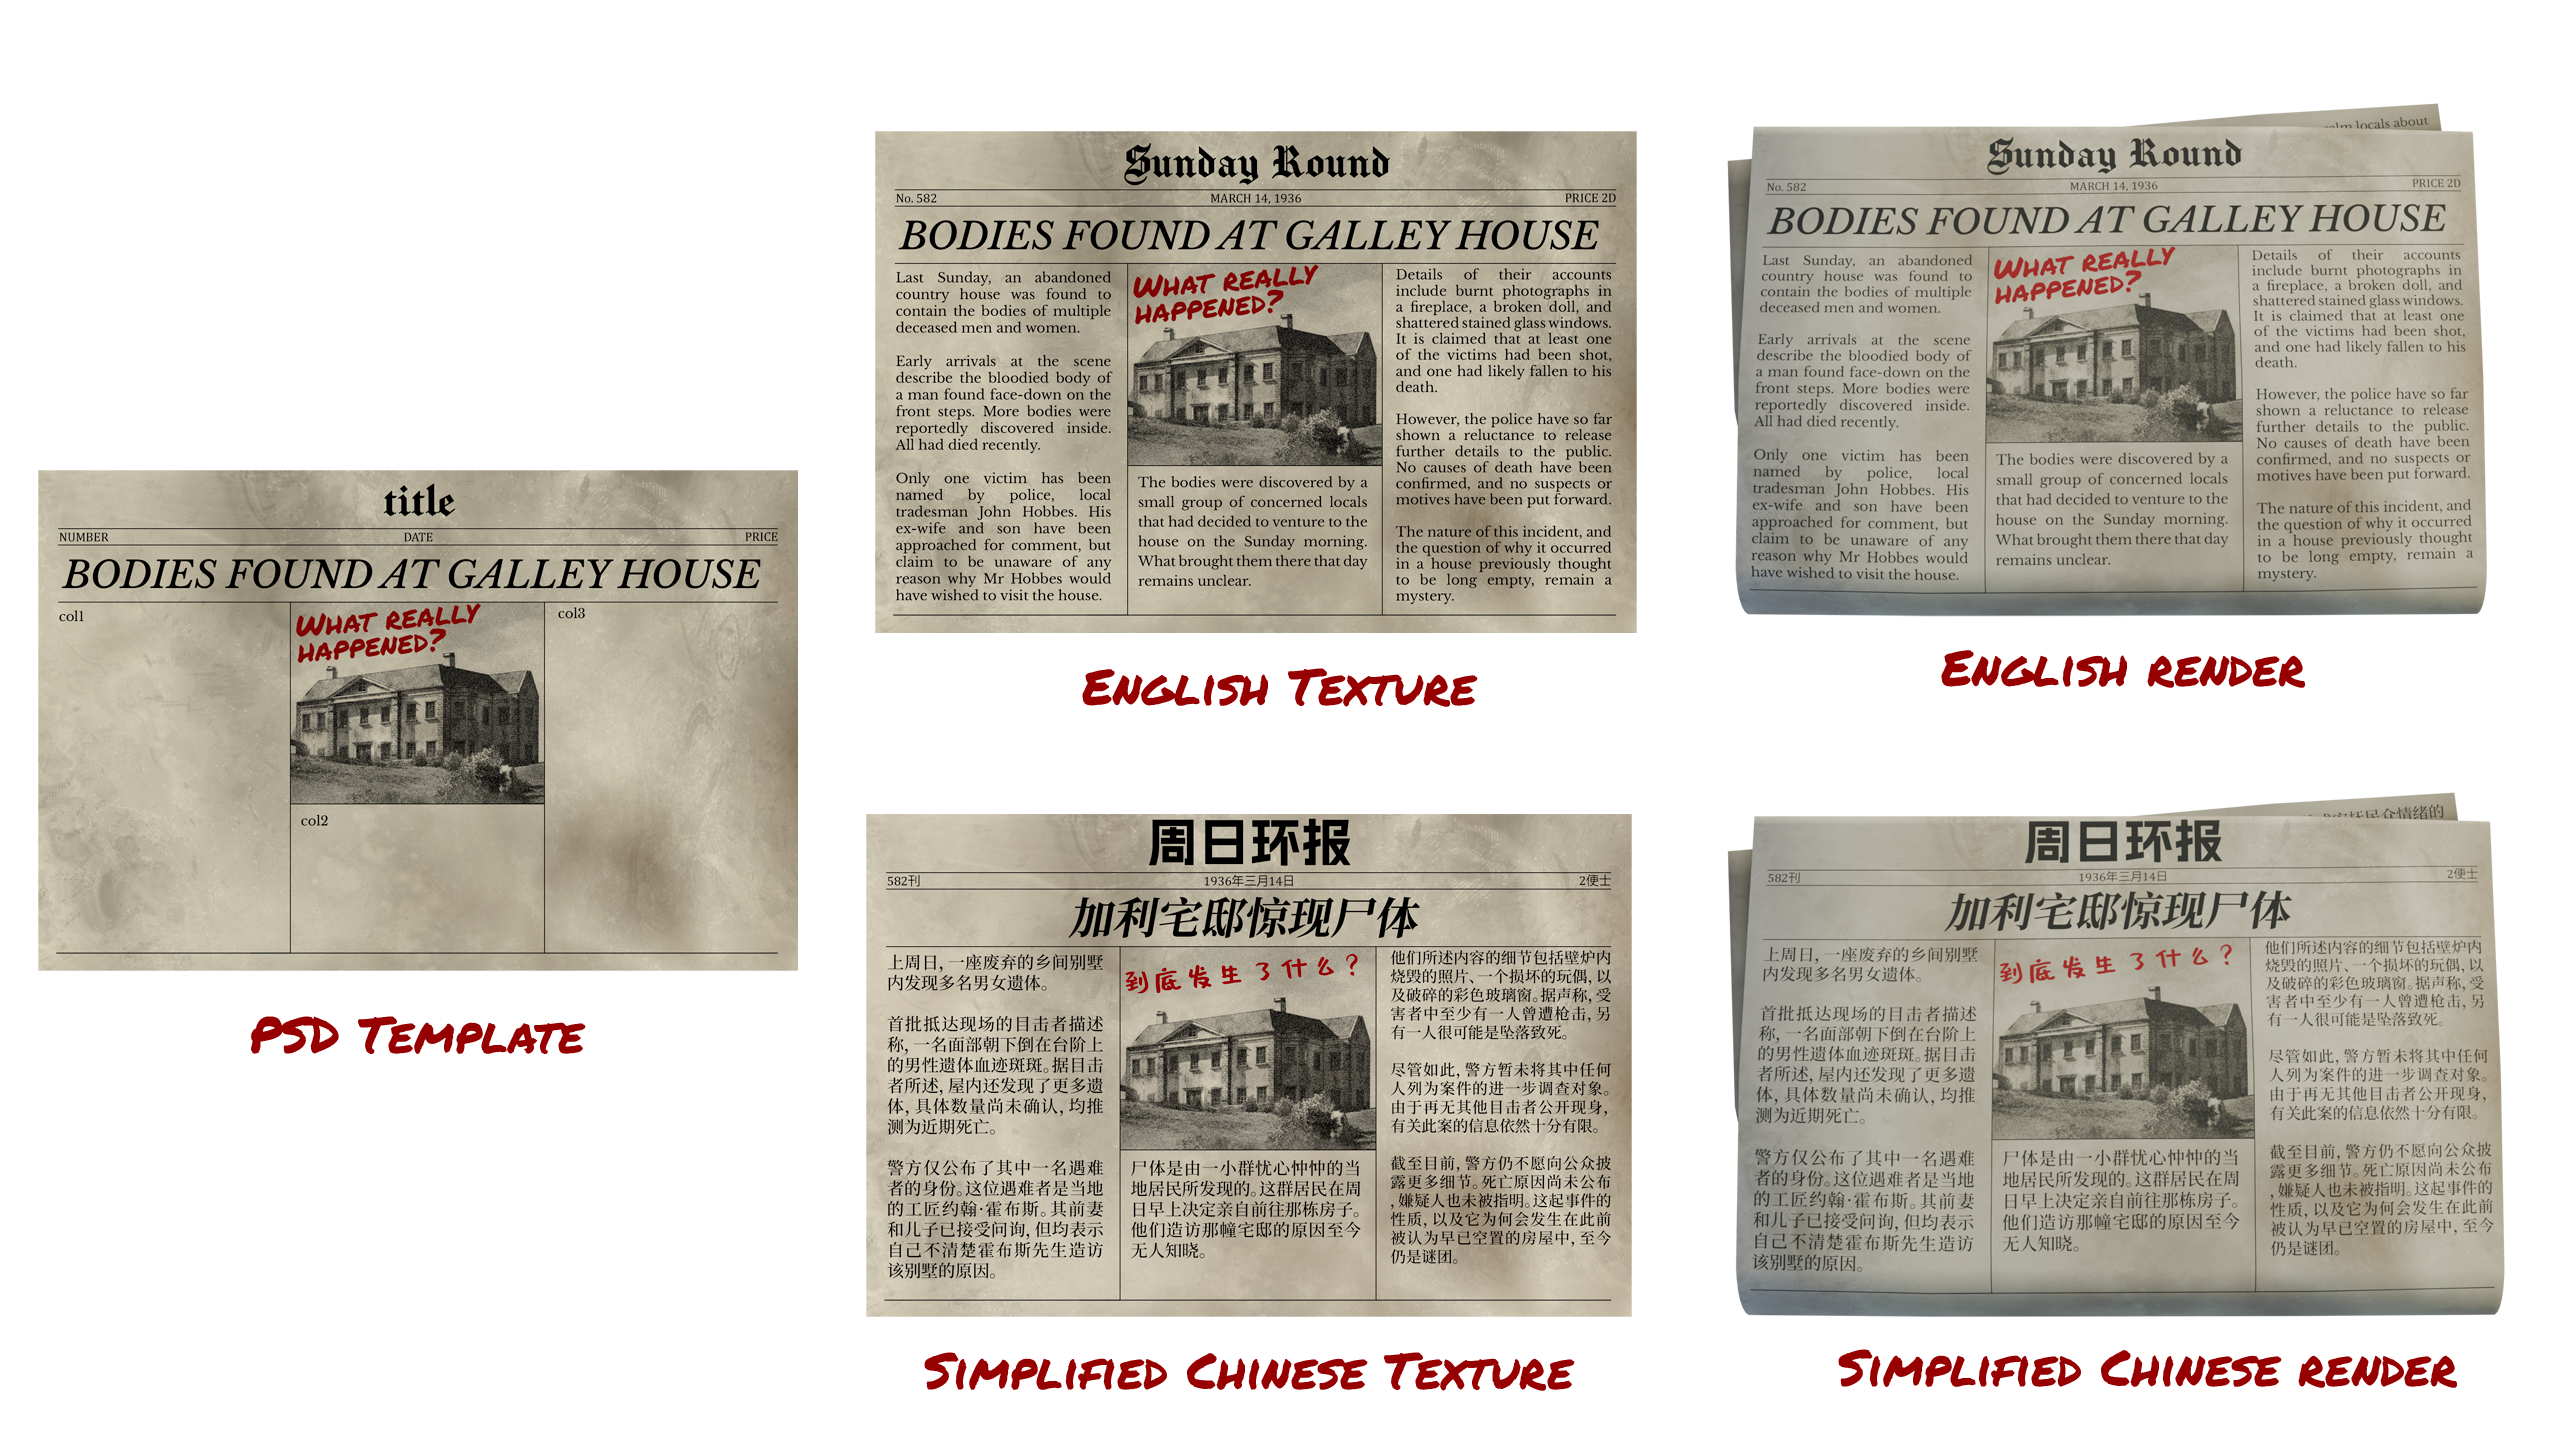
Showing the i18n process
Every image in the game that contains text has an associated PSD file with text layers and effects set up. If a piece of text is meant to be translated, its text layer has a key that corresponds to our localization tables.
I use Python scripts to orchestrate the process. Python will create a JSON file which is a series of instructions for Photoshop to execute. It’s typically a list of PSD files to open, the translated values for text to replace, and the output file.
It then spawns Photoshop to run a JSX script, which opens that JSON file with its instructions, and carries them out to produce the images.
This works, but we’re not done yet. It’s very hard to find fonts that look good in English as well as Japanese and Chinese. Also, often you can get away with far fewer characters so the font sizing looks weird.
I ended up writing a very basic CSS-like format to customize fonts and their sizes across documents. This made it really fast for me to iterate with different font faces and see how they rendered in all locales.
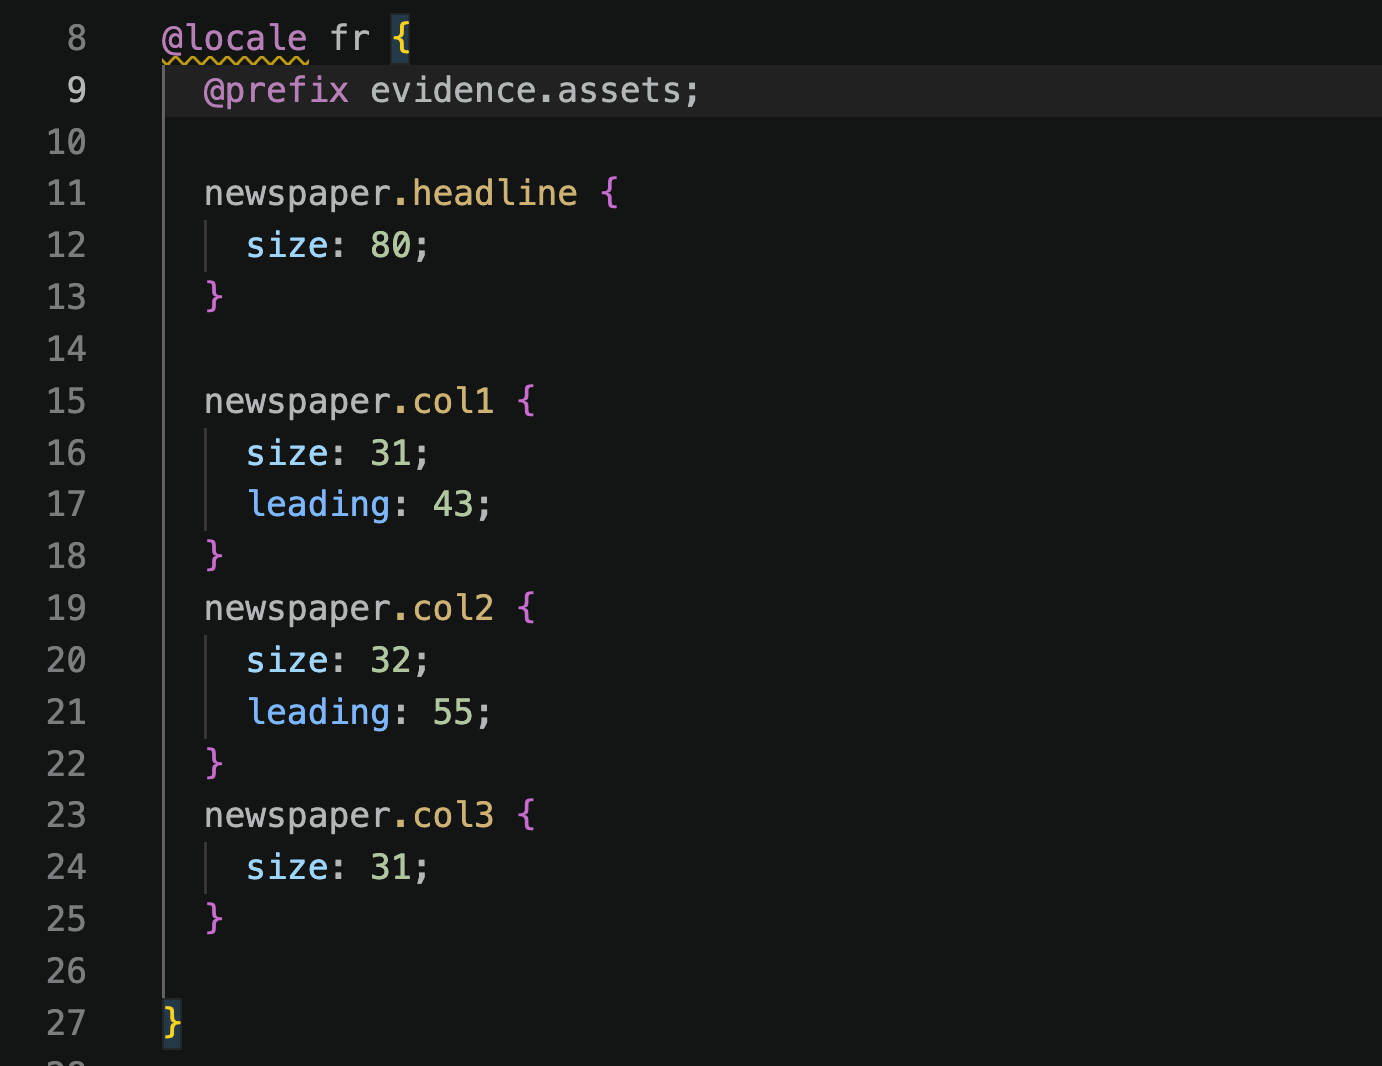
The CSS-like format for localization templates
At this point, we have a nice looking image we could use in the game as a texture. However, when you look at the images in your evidence, you get a nice pre-rendered image of it. Those images are rendered in Blender.
To render those images, the 2D textures exported from Photoshop are passed into Blender via command line arguments. It opens up a scene with a model, camera and lighting already set up, applies the localized texture image, renders it, then crops the final image.
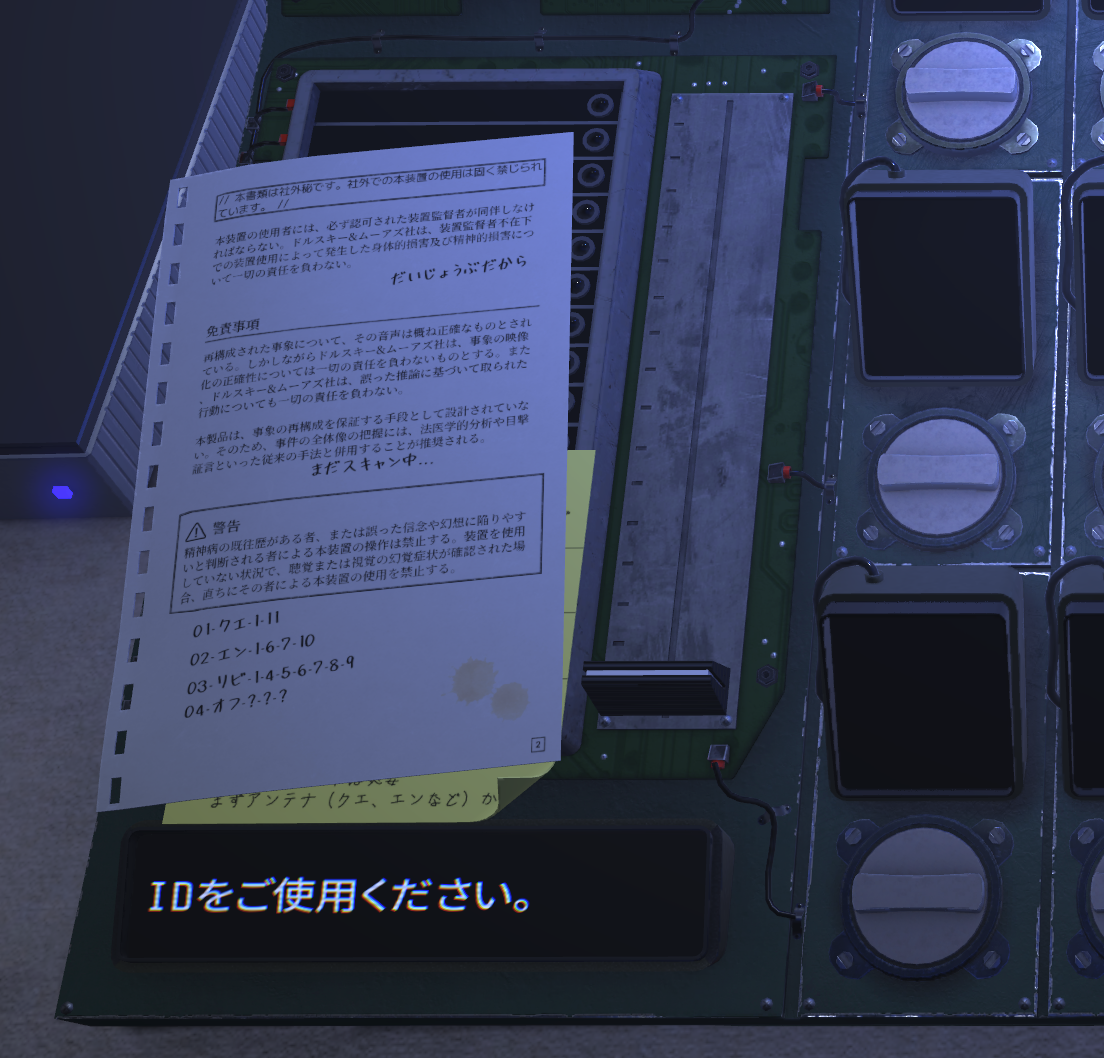
The 2D versions of the textures are used in the game’s 3D scenes.
The Python orchestrator remembers the previous hashes of the text it used, so whenever the translation data updates I can run it to re-render what changed.

The Rube Goldberg machine in all its glory
For the last few months of development, every morning I’d wake up, pull all the translations from the previous night, generate all the images, and check out a visual diff using Kaleidoscope before pushing them out as a build.
Final Thoughts
Making games is fun and it makes me happy!
The Incident at Galley House is a fairly simple game from a technical perspective, but what I love about making software is there are always a million fun decisions to make underneath. There is always more complexity than you’d expect.
Like with The Roottrees are Dead, I’ve been blown away by its reception. (Overwhelmingly Positive in less than 48 hours? What?!?)
There are a lot of people out there who are hungry for these types of mystery/deduction games, and I feel very lucky to have been part of bringing them to Steam.
I’m not sure what Evil Trout’s next project will be, but I’m looking forward to getting started!