Building The Roottrees are Dead
The Roottrees are Dead was released on January 15, 2025 and it did much better than I ever expected. The reception has been amazing. In just over a week, the game hit the magic mark of 500 reviews on Steam, and triggered the “Overwhelmingly Positive” status.
On BlueSky, Bloomberg writer Jason Schreier blew me away when he posted:
“Seven days into 2025 and I’ve already played what I suspect will be one of my favorite games of the year: The Roottrees Are Dead.” Wow!
Now that the dust has settled a little bit and I’ve caught up on bug reports, I thought it would be fun to write up some of the technical details involved in building the Steam version while they are still fresh in my mind.
I don’t think the game is anything special as far as game technology goes, but I did come across some interesting problems and learned a lot. Maybe you’ll find it interesting, too!
Table of Contents
- My Homelab Setup
- The Game Engine
- GDScript
- Resources as a Database
- 3D Assets
- Viewports and Themes
- Rendering the Family Tree
- The Highlighting System
- Unit Testing
- The Character Portrait Tool
- Playing Cutscenes
- Saving Games
- Final Thoughts
My Homelab Setup
I have a Linux server in my hallway closet with a couple of SSDs and a bunch of HDDs running ZFS. It acts as a NAS but also runs some server applications, notably my git server, Gitea. When I started playing around with game development, I was using a private plan on GitHub, but I wanted to keep large Substance Painter files in version control with GIT-LFS and I found it slow and expensive.
The server has a 10GbE wired connection to my PC, although some of the cables in my wall are not Cat6, so it runs closer to 6Gbps.
Gitea is a great piece of software. I have it set up using Docker, so updating it is simple. I love having my own little GitHub at home. Because of ZFS and the wired networking, it never takes long to fill it ingest large textures and other binary blobs.
The Linux server replaced an old Synology Diskstation I ran for many years. It has now been relegated to backup duty. A friend of mine keeps it at his house, and every night I ship all my files there, so if my home burns down I’m still good.
I do almost all my development at home. I have a Windows 11 PC with an i9-13900K and RTX 4090. It’s overkill for my game development purposes but I do stress it in Blender sometimes.
When I’m away from home I use a MacBook M1 Max. I connect to my home server using Tailscale. I briefly looked into setting up my own VPN, but it seemed far too complicated. Tailscale is easy and works well.
The Game Engine
The Roottrees are Dead is a Godot application. Godot is a pretty neat game engine. The first reason it caught my eye was because it was free and open source. Open source software has always appealed to me; I spent a decade of my life working on Discourse. At one point it was one of the most starred projects on GitHub.
Godot is the only game engine that doesn’t require you to sign up for an account and accept a myriad of legal agreements to use it. You can just download the executable and run it. Dark patterns in software development, such as user data harvesting, are so commonplace that it feels refreshing when something like Godot doesn’t care at all and lets you right in.
The Steam version of The Roottrees are Dead is a remaster/sequel (requel) of a free game released on itch.io by Jeremy Johnston. The original game was authored in Unity.
I had briefly considered learning Unity and upgrading the existing codebase, but I was already familiar with Godot and had planned on changing the user interface a lot, so I decided to start from scratch. The Steam version is a 100% rewrite with no shared code, and it took just over a year to complete.
GDScript
At first, I was put off when I saw they invented their own programming language, called GDScript. Who does that in this day and age? There are so many polished and battle-tested ones freely available.
I changed my mind fairly quickly once I started watching tutorial videos. Syntax-wise, GDScript is pretty close to Python, so they didn’t start from scratch. The beauty is they’ve added a bunch of domain-specific enhancements that mean you have to write much less code than if they were bound to another popular language. For example, vectors and rectangles are first-class types. You can use simple annotations to link your scripts to nodes in your scenes.
It didn’t take me long at all to learn GDScript and I found it quite productive. It has optional typing, which I used almost everywhere, as it helps with autocomplete and debugging. Apparently, it also runs the code faster,
but I never had any issues with GDScript’s performance. Any time I worried about an algorithm being slow my benchmarks told me not to worry about it.
Now that I’ve written about 20k lines of GDScript, I do have a couple of minor gripes.
-
There is no
Setprimitive. You can work around it with aDictionaryofboolfairly easily, but I always felt like it was making my code uglier than it should be. There’s a proposal for this functionality that I’d like to see implemented in the future. -
Primitives such as
Vector2are passed by value, but there’s no way to create your own structures that work that way. Any class you define is passed by reference. I do agree that most of the time this is what you want to do, but I had a couple internal APIs that would benefitted quite a bit from this. There’s also a proposal for this, but unlike the proposal forSet, it’s much harder to get right.
Resources as a Database
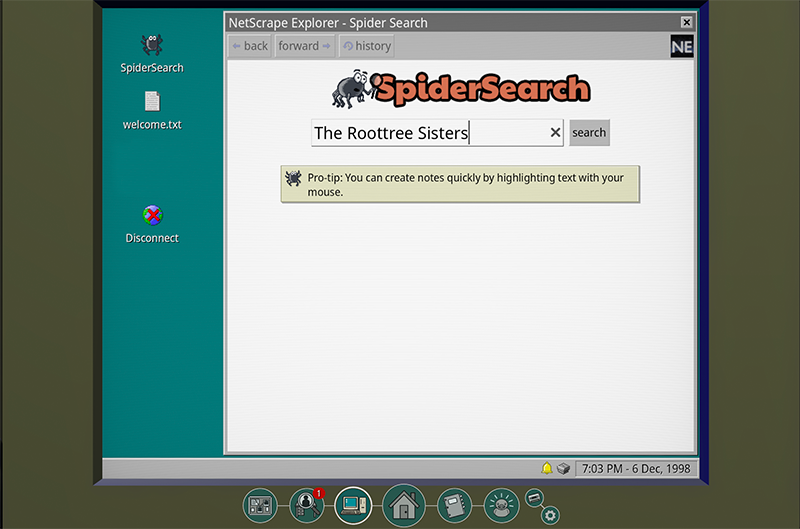
One core aspect of The Roottrees are Dead’s gameplay involves searching for terms on a fake version of the Internet and having results pop up. There is a lot of text in the game (roughly 90k words, the length of a novel!)
I knew fairly quickly that I’d need a database to hold all this data. Godot has a nifty concept of a Resource,
that’s essentially a singleton blob of data. Every time you use it in the game it’s pointing at the
same instance. Every asset you add to the game, including images, sounds, 3D models, are resources.
You can also define your own in GDScript, including containers of other resources, so they are ideal for game data.
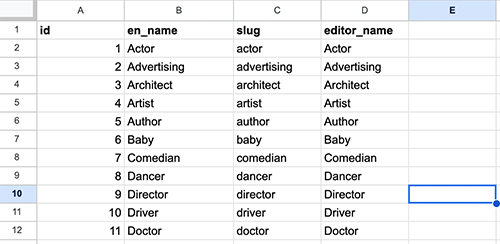
For example, in my project I have a SearchResult resource that is like one row in a database table:
class_name SearchResult extends Resource

@export var id: int
@export var search_engine_id: int
@export var title: String
@export var text: String
@export var evidence_ids: Array[int]
A SearchResultsList resource contains an array of SearchResult items, as well
as a dictionary for looking them up by id.
Finally, there’s a SearchEngine resource that you can query user input to retrieve the results.
If you want, you can populate data using the Godot editor, but I wanted an online version of the data that others could edit. For example, my good friend and long-time collaborator Mike Drach helped edit the text, and despite his technical knowledge, it would have been too much to ask to have him install Godot and learn Git.
Instead, I opted to put all the data into a big Google Spreadsheet with about a dozen sub-sheets, one per table, that I was able to share with others. The spreadsheet was populated with data from the Unity game by parsing Unity’s weird YAML format in Python.
I used a two-step process to import the data into the game. The first step was a Python script that uses the Google APIs to download the data. After that I performed some preprocessing on the data before handing it off to Godot, such as exporting fields that were meant to be translated into a CSV file.
The next step was a custom ImportPlugin in Godot, which read the files my Python script spit out and imported them into the Resources I’d defined. At that point the game could use them.
Overall, this system worked great, but as the game data grew in size, it became susceptible to human error. Part of me wishes I’d built a little web app to manage the data instead. It would have stopped some issues with copying and pasting over rows by accident, and it would have been easier to search and find records, but it also would have taken more time to build.
Another option might have been to do much more validation in the Python scripts that imported the data. I could have double-checked fields to make sure they were good, and that would have caught some bugs.
An aside: I’ve mentioned using Python a few times for scripting. Despite having written a fair amount of it, I still prefer Ruby. The main reason I used Python for these scripts is that Windows has great support for it. It’s unfortunate that after all these years, Ruby still isn’t great on Windows.
3D Assets
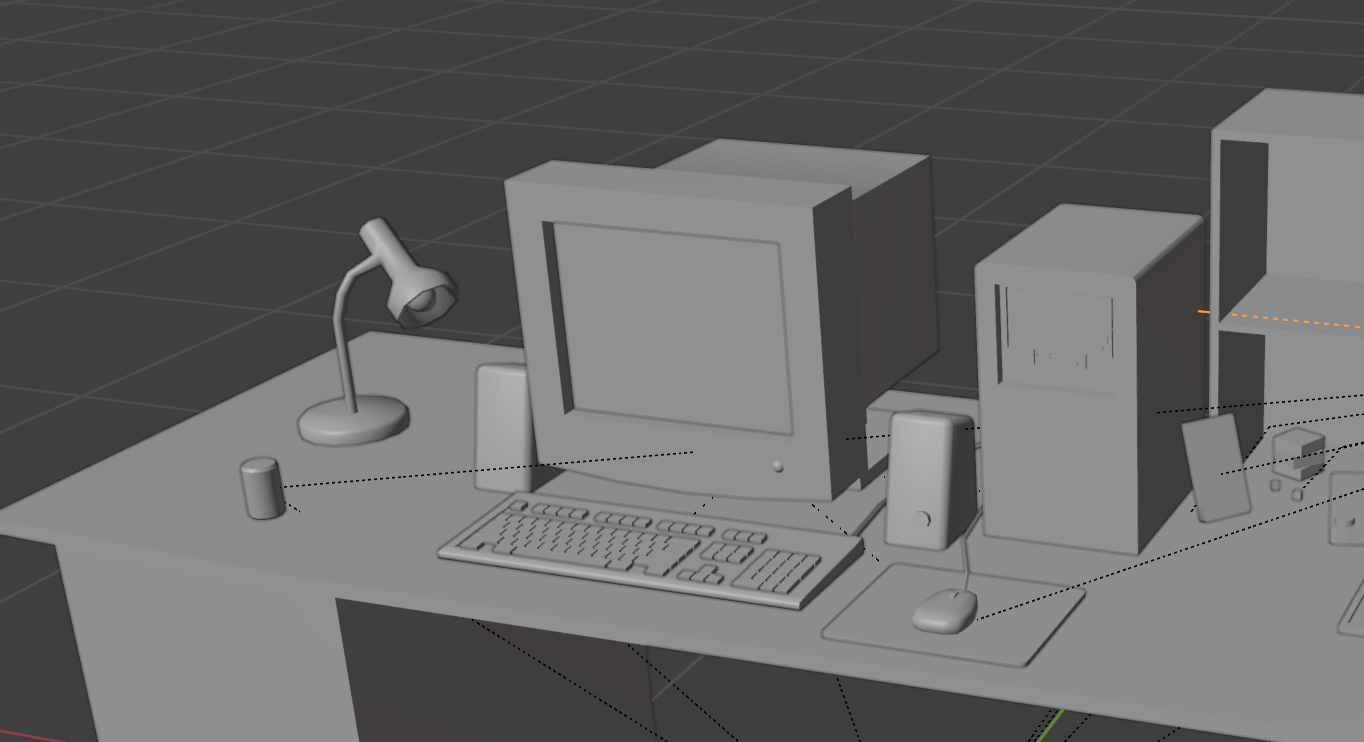
For the “Living Room” interface that you can explore in 3D, I made almost all the assets myself in Blender. I’ve been programming for most of my life, but 3D modelling is something I started learning a few years ago. I’ve always been interested in illustration and painting, and building out models in Blender really scratches that itch. I find the time just flies by when I’m modelling in 3D.
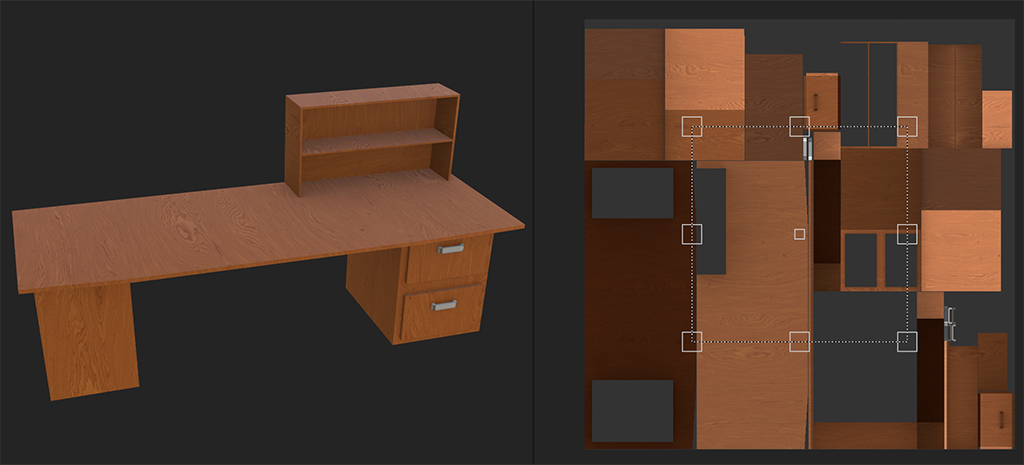
The textures in the game are all painted in Substance Painter, which at CAD $25.99/mo is the single most expensive piece of software I use. Unfortunately, the texture painting stuff in Blender is just nowhere near as good. I hope in the future that Blender’s texture painting will catch up. Even if it was half-way as good as Painter’s, I’d probably switch.
I could have used a lot more detail, but I was trying to make something that would run reasonably well on older computers. One bad assumption I made was that even integrated GPUs would have a fair amount of VRAM. It turns out the Intel MacBook Air from 2020 has only 1.6GB! Since the game came out, I’ve done a fair amount of work lowering the texture resolution here and there, even adding an option to use low-resolution textures for some assets. Even still, probably once a day someone with an 11-year-old computer asks me why the game won’t run, and my heart breaks a little 😭
Viewports and Themes
The in-game PC is a SubViewport to a
2D interface. To interact with it, a ray is cast through your mouse, and I find where it intersects with the monitor. Any
events, like keyboard keys and mouse clicks, are proxied through the push_input method.
One nice thing about Godot is you can control when the SubViewport is updated. When the player is at the computer, it’s done every frame. If you’ve moved away, it’ll only update during certain events, like windows opening or closing. There’s a nice little API to say, “update for one frame and let me know when done” that I appreciated.
I have a background in web development and over the years developed some front-end development skills, so I was not
sure what to expect from Godot’s UI systems. I was pleasantly surprised! The big lesson I learned was to rely on
containers for everything. For
an embarrassingly long time, I did not realize there was a PanelContainer and I suffered quite a bit trying to
get stuff to render the way I wanted.
Godot has a theming system that worked OK. I really missed the way CSS works, where a parent class can affect all the children. In Godot, something in your theme can inherit from something else, but if you do this to something you defined, the UI does not show the properties, and they have to be entered manually.
It would also be nice to declare variables for things like colours, and then reuse those variables across definitions in the themes. I found I had to copy and paste stuff a lot.
In the end, I have 9 different Godot themes in the game. This might sound like a lot, but this is a game that deliberately gives you different types of interfaces to use that all look/feel differently. By the time I implemented the last theme for redacted minigame, I was very fast and productive.
Rendering the Family Tree
The family tree is a 2D interface with a larger scrollable area. Godot helpfully offers scrolling and zooming code, so I just had to wire that up to mouse controls.
There are 2 extra SubViewports used for the family tree.
The first is used to render the soft shadows behind objects on the corkboard. My first attempt to do shadows was done by baking them into the textures for the cardboard cutouts. However, once I got to the string rendering, that all fell apart. The strings are rendered using Godot’s Line2D using a custom texture. If I included a shadow in that texture, it would not always be in the correct position depending on the angle the string was being rendered at.
My second attempt was to take every Line2D, duplicate it, offset it, and render it again. This kind of worked, but getting the offsets correct was tricky. Instead, I opted to render the family tree to a “shadow viewport” with a custom shader. The viewport had a lower resolution and would render everything in black and transparent. The final image is upscaled and sampled in the shadow viewport and composited in behind the original high-resolution rendering. During this stage I also superimpose a vignette near the edges.
One cool thing about the shadows is they rarely change, so like the PC SubViewport, I only render the shadows
when the content of the family tree itself changes.
The other custom SubViewport is used for rendering the tree while you’re in the main living room area. Again, this
is only done when the tree changes. The whole thing is rendered to a viewport and that texture is used when you
back out. Most of the time it’s pretty small detail-wise, but it’s nice to see all your progress even from afar.
The Highlighting System
In the original version of the game, the main way to create notes was to copy and paste them into your in-game notebook. This works well enough, but I had a new interface in mind that I thought would save the user time and make things more organized. If you highlight any text on the computer or in your evidence, a pop-up appears with the option to create a highlight. If you click it, the highlight goes right into your notebook.

The cool thing about the highlight is it’s bidirectional. Clicking on the source in the notebook takes you right back to where you found it. Conversely, if you browse on the PC to where you made the highlight, it’ll still be there, and clicking it brings you to the notebook.
This was technically one of the harder features to build in the game. The PC and evidence interfaces use Godot’s RichTextLabel with BBCode formatting. Godot helpfully has APIs for getting the position of the selected text, but those positions do not map back to the unformatted text before BBCode is rendered.
To display a rendered highlight, I needed to insert BBCode from where the highlight begins to where it ends. However, these could cross BBCode tags boundaries! I would sometimes have to split a single highlight into multiple spanning areas.
After thinking about it for a day or so, I decided to bite the bullet and write my own BBCode parser in GDScript. This might sound like an insane thing to do, but this feature was important to me, and I’d already written BBCode parsers twice before for other projects, so I knew what I had to do.
My parser would take a BBCode string and build an AST of
the text and tags. Each node also stored the text offsets into the string that my highlighter could
use. When I wanted to render the BBCode, I’d pass in a list of the highlights and their offsets, and
it would merge the two together into a new tree. At that point, I’d call the push_* and pop_* methods in
RichTextLabel myself to render it.
This is another area where I was worried about performance. Surely GDScript wasn’t designed to parse strings, build syntax trees, and then render them; however, it was super fast!
I found some bugs in Godot while implementing this feature, so I authored two pull requests (1, 2) that were merged into the engine. I don’t know C++ very well, but I found the code base to be well organized and clear. I think I spent more time getting an environment set up where I could compile/test/debug the engine than I did fixing the bugs themselves.
Unit Testing
I’ve heard unit testing is not super popular amongst game devs, but after 20+ years of doing web development, I ignored their wisdom and did it anyway. I found Gut, or the Godot Unit Testing Library to be quite capable.
Admittedly, I wrote far fewer tests on this project than I did on, say, Discourse, but I found it incredibly useful. The first major section I had tests for was the BBCode parser. It made the cycle of code/test/debug much faster, and I was able to give it many test cases as I refactored. It was a big win.
Later, I used it for the family tree “locking in” logic. Depending on where you are in the game, it has to determine how many entries on the family tree are correct and then lock them in. I represented the family tree state as a bunch of GDScript classes, divorced from the rendering code, and this made it very easy to test. Since shipping, I’ve had many bugs in the game reported, but none with that logic, so that worked out very nicely.
I did find myself missing something like Ember.js’s acceptance tests, where I could say, “okay, click on this, then make sure that happened.” I couldn’t find any way to do this with Godot, but maybe someday that will be possible.
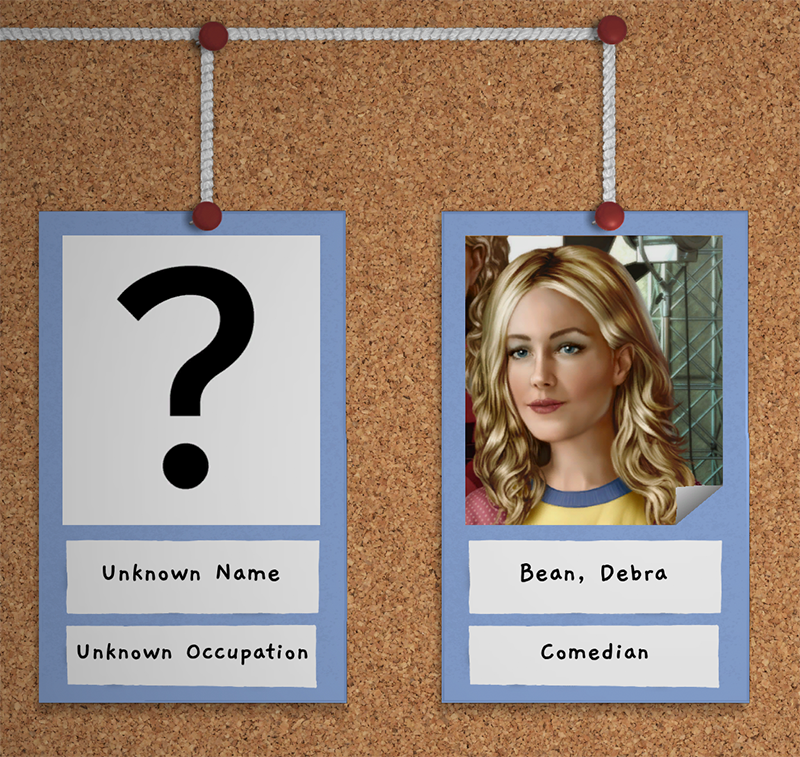
The Character Portrait Tool
When you place a person on the family tree, you have to add a photo portrait, that you extract from a piece of evidence by clicking on it.
Most pieces of evidence in the game contain at least one portrait, and some of them contain quite a few! I also needed to extract every portrait to a texture so that I could render them separately on the family tree, in pop-up windows, and elsewhere.
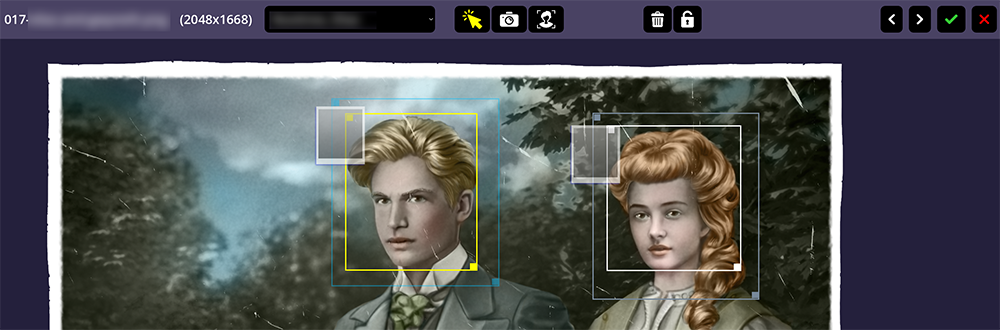
I ended up writing a standalone tool in Godot that gave me a directory listing of every evidence illustration in the game, and when I opened one, I could:
- Record the boundary for the click area of the portrait
- Record the boundary that to extract the image to a texture
- Choose the position and scale on the portrait where the “snipped” portrait would appear. I’d originally tried to calculate this in code, but I felt it always needed a manual touch.
The standalone tool would create a JSON file with all this information. I then had a Python script that would build a large texture atlas of every rectangular portrait in the game. I could bind the same texture to every material that needed it, and I used a simple shader to pick the position of a particular portrait by ID.
The tool took me roughly two days to code but saved me a huge amount of time overall. When placeholder art was replaced with professional illustrations from our artist, I could quickly jump in, move some rectangles around, click export, and the game was good to go. Godot is quite well suited for GUI applications. I think people should consider it for things other than games.
Playing Cutscenes
One thing that really impressed me about Godot when I started learning it was its AnimationPlayer system. It makes it really easy to animate just about any property in your game. It can also call methods and play sounds. The Roottrees are Dead uses it quite often.
However, for the cutscenes I wanted much more functionality:
- Individual dialogue lines needed to be skippable, but if you didn’t skip them, I wanted it to pause until you clicked.
- Conditional logic to do different things depending on what the player had done. This is usually different lines of dialogue but not always!
I ended up building my own abstraction to do this using the Command Pattern.
Each command would be something like SayDialogue, PlayAnimation or MoveCamera. Commands had a basic _on_start method,
and had to call _finished() in their base class when the step was over. They also could implement _on_skip if they were
skippable by the user.
A very useful command was sync(), that could take a closure to execute any code I wanted at that point. And then
any cutscene could declare finally() that would be called to set the game explicitly to the desired state at
the end of the scene in case it was skipped.
Here’s an example of the code that plays the intro cutscene:
func build_intro() -> CutScene:
	var home := context.home
	var scene := _create_scene(&"intro.start")
	scene.sync(func():
		home.music_player.stop()
		context.cameras.cut_to(&"home")
	)
	scene.use_camera(home.active_cam)
	scene.hide(home.indoor_lights)
	scene.sync(home.fan.light_off)

	scene.delay(2.0)
	scene.show(intro_date)
	scene.delay(2.0)
	scene.hide(intro_date)
	scene.delay(0.5)

	scene.animate(home.tv_animations, &"intro")
	scene.animate(title_card.animation_player, &"show")
	scene.use_camera(home.active_cam)
	scene.delay(1.0)

	scene.finally(func():
		intro_date.visible = false
		title_card.visible = false
		home.active_cam.make_current()
		clear_subtitle(_last_tv_sub)
		home.fan.light_on()
		home.indoor_lights.visible = true
		home.tv.stop()

		if !home.music_player.is_playing():
			home.music_player.play(&"RoottreesAreDead")
	)
	return scene
Saving Games
The save game code was taken from The Secrets of Skellig, the game I was working on prior to this project.
There is a global Store object in the game that manages an abstraction called Chunk. Anywhere in the game where
I want to remember something permanently, I can declare an instance of a Chunk and register it with
the store by id.
The Store spawns a background thread that sleeps most of the time and periodically checks for dirty data. If it
finds something new to write, it triggers an operation where the data is written to a temporary file, and once complete,
moves it into place.
GDScript exposes some nice methods for spawning and working with threads, but as with most languages, you have to be very careful when doing it. It’s easy to shoot yourself in the foot if you aren’t being careful about shared resources.
In theory my code can never write an incomplete save, as the save will never move into place unless it was created successfully. Unfortunately, I have gotten a couple of rare bug reports of corrupt save files, which is baffling to me. One was entirely full of zeros! I assume this is some kind of hardware failure, but I’m not sure how it’s possible. It’s something I’ll have to think about in the future.
Final Thoughts
This is the first game I’ve shipped in almost 20 years, and I had a lot of fun working on it. Game development flexes quite different muscles than the web development I spent most of my professional career on.
In particular, I found myself doing a lot more work up front to pre-process everything. If I had a list of names to sort, why bother at runtime? I could sort it in advance! In the web world, your database is usually growing all the time, and you have to be able to query the current state. In a game, an embarrassing amount of data never changes.
In general, I tried to avoid creating new objects, especially if it was some operation that happened frequently, like every frame. If there were a way I could create my instances up front and then reuse them, I always would do that.
Speaking of frame-based code, by default, Godot’s templates will create a _process() method on any node you want
to script that executes every frame, and I found I almost never wanted that! I always preferred to trigger things
from user input callbacks. If something needed to move in the background, I’d create a
Tween or a
Timer to worry about it.
The game has already sold enough copies that I can justify funding and working on another one. I’m not sure what that will be at this point. I might return to my crossword game, or spend some time prototyping a couple of other ideas. A few people have even pitched me their game ideas, but nothing has excited me so far. If you have a proof of concept of a detective/mystery-type game, please reach out and let me know; I’d love to hear your idea.