Home streaming my games in 4K
I have two 4K TVs at home, one in the bedroom and one in my living room. Both have consoles attached. One has a PS4 Pro and one has a Nintendo Switch and both are great.
However, I also have a gaming PC in my office, which is quite powerful compared to any home console Mine is equipped with a RTX 2080 TI GPU, and a 9900K processor, so it can play pretty much any new game at 4K with a solid 60 fps on high settings.
For any cross platform AAA game, my PC is going to provide a signficantly better experience than the consoles. It can do 4K without upscaling techniques like checkerboard rendering. Also, thanks to a NVMe M.2 SSD, it loads games and levels significantly faster than any home console.
PC Gaming is a little more janky than console gaming, as there can be things to mess with like device drivers, but given the chance I always prefer it. Having said that, I also work from home, and sometimes I want to get out of my office and play games on the couch instead of an office chair.
I briefly considered building a second gaming PC to attach to one of my TVs, but that’s a considerable cost just for the ability to game on my couch or bed. Instead, I decided to try out streaming from my home PC to my other TVs.
I buy most of my PC games on Steam, and it has a product called Steam Link which allows you to stream games from your PC to other devices.
Apple TV 4K: Setup
I already owned an Apple TV 4K, which as of tvOS 13 allows you to pair game controllers and supports the Steam Link app. Installing the Steam Link app is quite easy as it’s available in the App Store, but I did have a little more trouble getting my Xbox One controller to work. tvOS found it and I was quickly able to navigate the menus, but the Steam Link app insited on being taught the buttons on the controller. In theory that should have been easy and simply involved pressing each button one at a time, but several of the buttons would quit out of the Steam Link app and back to the home screen! Fortunately I found a workaround and was up and running. Afer that, Steam launched quickly and my games worked perfectly.
Apple TV 4K: Performance
The Apple TV initially showed a lot of promise. My games were up and running in seconds in 4K and as I moved the camera around they sure felt like they were running at 60 frames per second.
Unfortunately, as I started to actually play the games, I got the feeling that something was wrong. I was playing Prey, a first person shooter, and the reticule just felt off. It was so subtle that I was wondering if I was making it up or if it was something I was really experiencing. I lowered the resolution to 1440p and it felt much better and playable.
I tried another game, Resident Evil 2, which is a 3rd person shooter, and felt similar problems aiming at zombies.
To help debug, I was very happy to see that Steam Link has an option to display a visual overlay with lots of extra information. While playing Resident Evil 2 in 4K, it reported that it was playing at 60 frames per second, with 1.5ms of input latency and 80ms of display latency.
At 60 frames per second, there should be one frame rendered to screen every 16ms or so. The display latency being 80ms meant I was about 5 frames behind which is not ideal, but the way steam split off display and input latency implied to me that it prioritized my input over the display. 1.5ms delay is such a small number that it was hard to believe I was noticing anything at all, as it should have been receving my input quite frequently.
Improving my Network: The Overhead of MoCA
At this point I decided to see if there was any way I could lower those numbers. Like most people, I have a wireless network, but I have hard wired several points. My Apple TV and computer were connected via Gb Ethernet, which is quite fast.
However, something came to mind about my setup: My TVs were near Coax outlets and had no ethernet jacks. To wire them, I’d set up MoCA adapters.
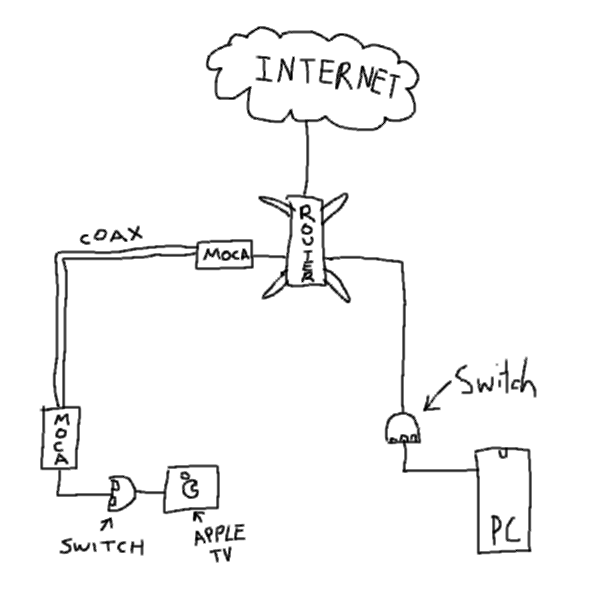
This meant that for my PC to reach my Apple TV, it had to go from my PC to a Gb switch, then to my router, then into a MoCA adapter in the closet, then through my Coax cables, out into another MoCA adapter, finally to a switch and then into the Apple TV.
That’s quite a lot of steps! As a test, I pinged my NAS near my router that did not need to go through the MoCA adapters and received a response time of <1ms. Pinging my Apple TV was taking around 3-4ms for the round trip, which lines up with the 1.5ms that Steam was reporting. It seems that performing the conversion from ethernet into Coax and back took about 1.5ms each way!
Now I should report for most networks, that’s a perfectly acceptable ping. However, I wanted my streaming experience to be better, so I thought of ways I might remove them.
I’ve not had a cable subscription for over a decade, so I wondered how challenging it would be to replace my Coax outlets with ethernet jacks. To do this, I unscrewed the face plates for the Coax outlets, and disconnected the cables from the plates. I then went into my closet where they connect to a splitter and pulled slightly. Surprisingly, they moved!
I bought a box of bulk Cat5e, and duct taped one end of the bulk cable to the Coax cable, then pulled from the other side. I got a little worried at one point when it jammed, but I pulled harder and it jogged loose and came through. The next part was more challenging for me: I had to attach jacks to each cable. This task is quite challenging as each twisted pair in the ethernet cable has to be weaved into an impossibly small area before you punch it down, but it was even harder for me because I’m colourblind. I ended up getting a somewhat crappy app on my phone that I could point at a cable and it would give me a rough idea what colour it was.
After hours of frustration that involved rebuilding and testing the cables over and over, things worked perfectly. I powered everything on, and Steam was reporting less than 1ms of input delay, and my display latency had dropped to 65ms.
Another thing I wondered was whether the switches were adding latency. I experimented with 1 switch instead of 2 and even a direct connection and noticed no measuable difference. Any overhead added by a switch did not seem to matter in my experiments.
Apple TV: Gigabit Performance
I did immediately notice an improvement with the better input and display latency. Things were now much more playable than before. However, I’d already made some progress at improving those numbers and I wasn’t out of ideas! The display latency was still quite high, and I couldn’t help but think the AppleTV was not the ideal device for doing this.
To test my theory, I connected my laptop to the same network port. My laptop does not have ethernet, so I had to use a USB-C ethernet adapter. When I started up Steam I had better results! Input latency was the same but the display latency dropped from 65ms to 55ms. This was surprising indeed because I have always heard that USB ethernet cards are quite bad. I decided to investigate alternatives to the Apple TV.
nVidia Shield TV Pro: Setup
On paper, the nVidia Shield TV Pro is not much better than an AppleTV. Both have 3GB of RAM, and in this CPU benchmark I found the AppleTV processor seems superior. Still, I decided to give it a go.

The setup was quite good. It’s an Android TV device and I find the overall UX not as polished as tvOS, but definitely not unpleasant. It paired with my Xbox One controller right away and the Steam Link app had no issue using it without the annoying button configuration I had to do on the Apple TV.
Without any changes to the base configuration, I was streaming at 4K with sub-1ms input latency and 45ms display latency - the best results I’d seen to date.
I was able to improve things even further after experimenting with the settings. I’d turned on HEVC streaming because on the AppleTV I noticed a minor improvement. However, on the shield I found that by disabling HEVC, my display latency dropped into the 35-40ms range.
With these numbers, not only were all my games playable at 40k@60, but I couldn’t notice any lag whatsoever. I’d found my perfect setup. Since then I’ve put in over a dozen hours of streaming various kinds of games and it works like a dream.
Moonlight
Update Nov 26, 2020: I’ve since found that Moonlight Game Streaming works better than Steam’s streaming, and has the benefit of being able to stream games that come from other stores than Steam.
I now recommend running nVidia’s streaming with Moonlight as a client. It can do 4k@60Hz for any game with no noticeable lag.
TL;DR
- The best setup for in-home 4K, 60fps game streaming is a gigabit wired ethernet with an nVidia Shield TV
- Do whatever you can to minimize the ping time between your PC and streaming device
- Use nVidia’s streaming to Moonlight.